
Adobe Lightroom: Add vignette
With Adobe Lightroom, you can quickly add vignettes to your image - we'll show you how to do it.
Vignette styles: These 3 are in Lightroom
In total, you can add three different vignettes with Adobe Lightroom version 5.4. It is best to try out for yourself which style suits your picture best.
- "Light priority" gives you bright areas that are on the edge of the image. The photo areas are thereby weakened, but remain recognizable. In the past, you could stop this effect by weakening the vignette's thinking power.
- "Color priority" pays attention to the colors below the vignette and less to the bright areas of light. This reduces color shifts.
- "Color overlay" is what most users imagine a vignette to be: a simple black or white vignette border, regardless of the areas underneath. So this is the classic variant.
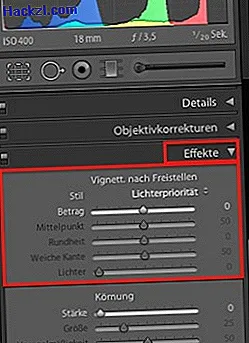
Add vignette in Lightroom - in 5 steps
- Open your picture and select the "Develop" mode.
- Scroll on the right side in the modules to the entry "Effects" and open it.
- The first entry in the effects is "Vign. After exemption". You can use it to place a vignette over the picture.
- Now choose your desired style. Use "Amount" to regulate the strength of the vignette. A negative value is a black vignette, a positive value is a white one.
- "Center" controls the size of the center. With "roundness" you can define how round or rectangular your vignette should be. And you can use "Soft Edge" to set how hard the edge should be.
With the image editing tool you can do even more than you might think: For example, we will show you how you can create HDR images with Adobe Lightroom.