
Install Android Things on the Raspberry Pi - Here's how
Android Things is the new Android distribution from Google, which for the first time is no longer aimed at smartphones and tablets, but instead focuses on various IoT devices. In this tutorial, we explain how to install Android Things on the Raspberry Pi.
Android Things: Prepare SD card
First of all, you need a commercially available MicroSD with 8GB or more storage space.
- First, visit the Android Things Console. Click on "Tools" in the sidebar and then on "Download" to download the Setup Utility.
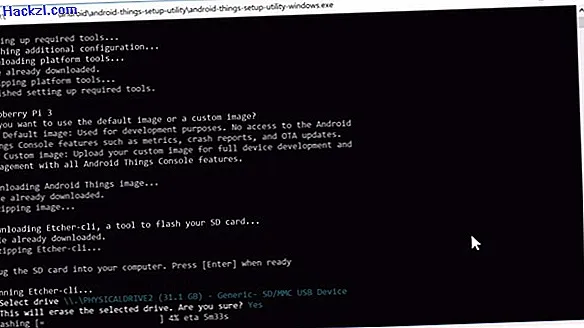
- Start the program on your PC and insert the MicroSD. Enter a 1 to download Android Things and select the Raspberry Pi by entering a 1. Also choose - again with a 1 - the standard image. The MicroSD can then be partitioned and provided with Android Things.
- We will also show you all the important steps in the picture gallery at the end of the article.

Raspberry Pi: Set up WiFi connection
After Android Things has been successfully installed on the MicroSD, you can remove it from the PC, plug it into the Raspberry Pi and boot it up.
- To set up a WLAN connection, you can either use the mouse, the keyboard and the screen directly on the Pi, or you can also use the Setup Utility. If you prefer the latter, however, you will need to briefly connect the Pi to your router using an Ethernet cable.
- Alternatively, you can completely do without WLAN and only provide a connection via LAN.
Program Android Things
You need Android Studio to program an app for the Raspberry Pi.
- Start the program, click on "Configure" and select the "SDK Manager". Make sure that you have "Android 8.0", "Android API 27", as well as the "Android SDK Tools" and the "Android SDK Build-Tools" installed and up to date. To install, simply tick the desired package and click "Apply".
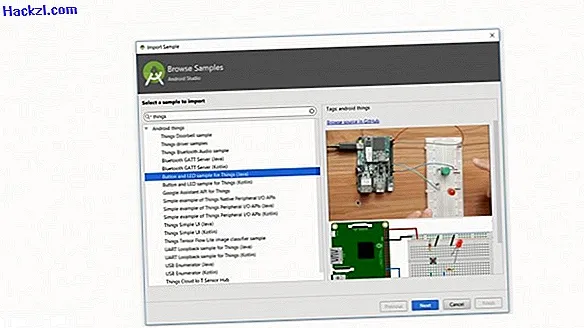
- Then click on "Import an Android code example" and enter "Things". For testing, we choose "Button and LED sample for Things (Java)" at this point. Also, don't forget to build the right circuit. This is usually also shown as a preview of the project.
- If you have an older version of Android Studio, you will be asked to update it.
Sign and import APK
In this example we just want to leave the code as it is and install it on the Raspberry Pi.
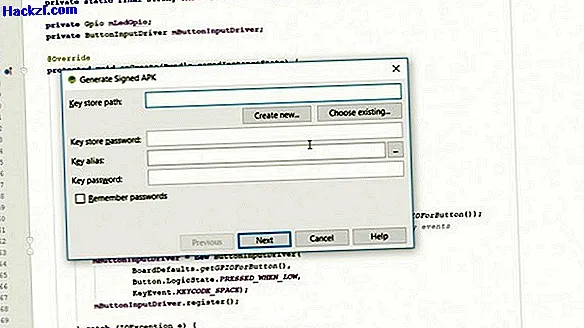
- To do this, click on "Generate Signed APK". If you have not previously signed an APK, you must first enter a key. You can create such a key, for example, with the "KeyStore Explorer" program. The key should be a Java KeyStore (JKS) with RSA encryption and a size of 2048 bits. Tip: If the Grandle refuses to build the project, select "Google APIs (...)" in the "Project Structure" as "Compile SDK Version".
- You should also make sure that ADB and Fastboot drivers are installed system-wide. Fortunately, there are many quick and practical installers for this.
- Finally, open CMD and enter "adb connect" and then the IP address of your Pi. To install, enter "adb install C: \ ... \ app-release.apk". After a restart, the application is already available.
In the next practical tip we will give you an introduction to the programming language "Java".
Latest videos
First download the Setup Utility.

Install Android Things.
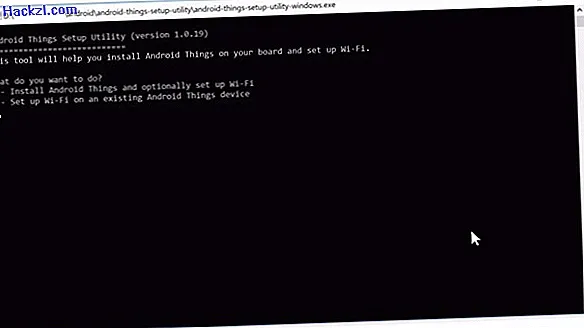
Choose the Raspberry Pi.

Also choose the default image.

Insert a MicroSD on which Android Things should be installed.
You can set up WLAN either in the Android Things interface or in the Setup Utility.

Make sure that you have "Android 8.0", "Android API 27", as well as the "Android SDK Tools" and the "Android SDK Build-Tools" installed and up to date.

Click on "Import an Android code example" and enter "Things".
Sign the APK.
Install the app via ADB.
