
Use animation paths in PowerPoint - a guide
In this practical tip, we give you instructions on how to use animation paths in PowerPoint.
What do animation paths do in PowerPoint?
- Animation paths highlight objects in your presentation.
- The objects move on the slide and thus catch the eye of the beholder.
- There are many saved paths at PowerPoint. However, you can also create gradients yourself.
Use animation paths in PowerPoint
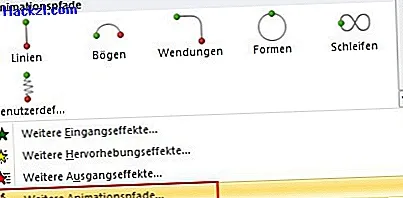
Some paths are available by default.
- Open your presentation with PowerPoint.
- Select an object on a slide (e.g. picture, word or sentence). If you select an object, the animation is only carried out for this object. If you click in the text field, the animation will be transferred to all points.
- Go to the "Animations" tab.
- Click on "Add animation" and scroll to the pre-made paths. Under "Other animation paths" you will find additional animations.
Draw your own animation path
- In the "Animation" -> "Add animation" tab you will find the "User-defined path" symbol.
- Select your object again and click on "User defined path".
- You can now draw your own path with the mouse. Then confirm with the Enter key.
- You can customize the animation by right-clicking on your path and going to "Edit Points".

Connect multiple animation paths
Follow the next steps to combine two paths into a smooth animation:
- First add the different paths to the object.
- Now select the second path on the slide by clicking.
- Drag this path with the mouse to the end symbol of the first path.
- Now the second path continues at the end of the first.

This practical tip relates to Microsoft Powerpoint 2010. The next practical tip shows you how to add invisible slide notes.