
Instructions: Flashing a firmware with Odin
Odin is a program for flashing on Android devices from Samsung Firmwares and thus modifying, resetting or re-recording the smartphone. We show you how to use this flash tool correctly.
Downloads and configuration of Odin and your Samsung device
There are a few things to consider before actually flashing: Since you are working directly on the Android system "under the hood", small errors and deviations from the instructions can be fatal and lead to your device being damaged beyond repair or the manufacturer's guarantee void.
- If you do not have ODIN on your PC yet - Here you will find the download of the latest version
- To do this, the current drivers for connecting Samsung's Android devices to the PC must be installed. If you want to be on the safe side, you can download and install the relevant files here.
- Find the right firmware: What should later be on the smartphone must first be on the PC. On the website sammobile.com you will find the most extensive collection of current, official Samsung firmwares. After registering for free, you can download the desired PDA files, which are up to 1.5 GB in size. Pay attention to the correct designation of your device and the country code!
- The later flash resets your Samsung device to the factory settings - so back up all contacts, messages and files that are important to you!
- Although ODIN does not automatically work when the cell phone charge is below 50%, the battery should be fully charged. If the battery runs out during flash, your cell phone is practically irreparably damaged.

Specific preparations for the flash process
Before proceeding, you need to make sure that USB debugging is enabled.
- Put the device into download mode: Switch off your Samsung smartphone and restart it while holding the "Home", "Volume down" and "Power" buttons. After a warning, which you accept by pressing the "volume up" key, you will be taken to the desired download mode.
- "Run Odin": Run the EXE file of the downloaded Odin folder with administrator rights to run "Odin3".
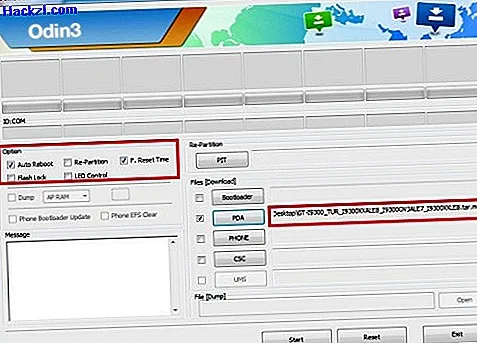
- Select PDA & check settings: In the window that appears, you must pay close attention to the ticks set and correct them if necessary. Check marks may only be set for "Auto Reboot" and "F. Reset Time" (NOT for "Re-Partition")! Second, navigate to the downloaded firmware file under "PDA" and select the TAR or MD5 file.
Flash the firmware with Odin
So far you have been on the safe side, now it gets serious: If you have made mistakes in the preparation, you can damage the device in the following steps. So be doubly sure that you have followed everything.
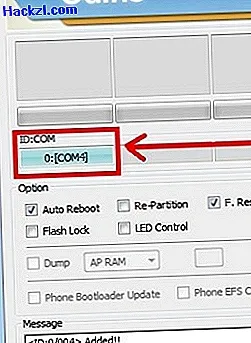
- Establishing a connection: It is best to connect the Android phone to the PC in download mode with the original Samsung USB cable. When plugged in for the first time, drivers may still be installed, which takes additional time. Then the window marked in the picture under "ID: COM" should fill and become colored - now your Samsung device is correctly connected (see screenshot).
- Check & Start: Check all settings again and then start the flash process by clicking on "Start". Make sure that the connection is never broken during this time.
- Wait & Enjoy: You can follow the progress of the flash in the status report at the bottom left. Flashing may take a few minutes during which your device will restart. However, you can only remove the cable when a thick, green "Passed" is emblazoned in the upper windows. If this appears, the flash process via Odin was successful. Now you can look forward to the new firmware.
Tip: If you have a Samsung Galaxy S4, we even have a video guide for flashing via Odin ready for you here. This manual (and the associated picture gallery also works with other devices.