
Apple Mail: Activate SSL encryption
To transmit your email more securely, SSL is used, a protocol for encrypting data. Read this practical tip on how to activate SSL in Apple Mail.
Activate SSL with a new email account
If you want to prevent your emails from being sent in plain text and thus theoretically read by others, you should switch your email account to use SSL.
- If necessary, make sure that you have your provider's information on the server settings at hand. In the picture gallery you will find screenshots of the individual steps.
- Open "Mail" -> "Settings" and click on the "Accounts" icon.
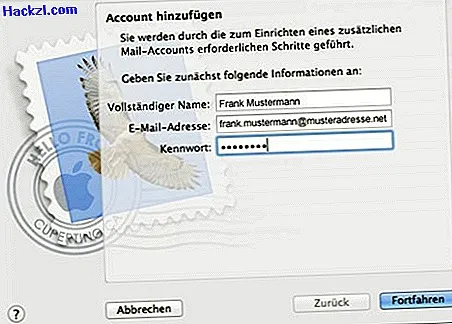
- To add a new account, click on the "Plus" at the bottom left.
- Complete the fields accordingly and then click on the [Continue] button.
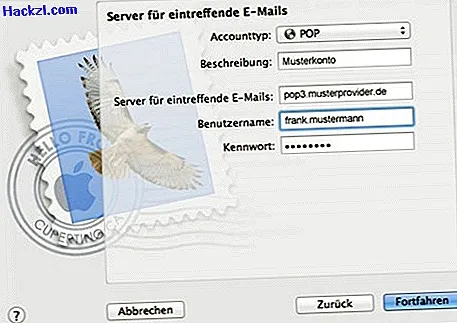
- Now complete the missing information in the "Server for incoming e-mails" window. Since the current version of Safari supports automatic SSL configuration, manual activation may be necessary at this point. It may only be necessary for older versions of Safari, or if the provider does not automatically offer SSL encryption. Then click on the [Continue] button.
- In the "Server for outgoing e-mails" window, proceed exactly as described in the previous section and click the [Continue] button again.
- Apple Mail now shows you the summary of the account you have set up. Check whether SSL is marked as activated.
Activate SSL for existing email account
If you have already set up an email account but have not yet activated SSL in Apple Mail, proceed as described below. It is also advisable to have your provider's information on the server settings at hand.
- Open "Mail" -> "Settings"
- Select the corresponding account in the left column and use the [Account information] and [Advanced] buttons to make the settings according to the specifications of your service provider.
You can find out how to convert Windows Live Mail to SSL in this practical tip.
Latest videos
Add a new user account.
Then edit the incoming server.
You must also adjust the settings in the outgoing mail server accordingly.

Check your entries in the account summary.
