
Arduino: set up a GSM module - how it works
In this practical tip, we will show you how to correctly use and set up a GSM module together with an Arduino.
Arduino: Set up the GSM module - the required components
To set up a GSM module, you of course first need a GSM module. We will also show you all the components again in the picture gallery at the end of the article.
- You also need an Arduino, a power supply, a USB cable and three male-jumper cables.
- In order to be able to use the module correctly, you still need a SIM card.

GSM module: insert SIM card & activate software serial.
First of all you have to take some precautions on the GSM module.
- First insert a SIM card on the back of the GSM module. However, first make sure that it is not protected with a PIN.
- You also have to change the two black connectors on the GSM module. You can see in the picture how these should be arranged correctly. This ensures that the "SoftwareSerial" module uses what is important for this project.

Arduino: Install the library for the module
To use the GSM module correctly, you need a suitable library.
- First download this library from GitHub.
- Then extract the ZIP file. In the extracted folder you will find another folder with the same name. Cut this folder out and paste it into the Arduino IDE's libraries folder. You can find this at "C: \ Users \ your_username \ Documents \ Arduino \ libraries".
- For the sake of clarity, also rename the folder "GSMSHIELD".
- Then edit the "GSM.cpp" file and change the "_GSM_TXPIN_" to 7 and the "_GSM_RXPIN_" to 8 in lines 27 and 28.
- In the file "GSM.h" on lines 45 and 46, change the value for "GSM_ON" to 9 and the value for "GSM_RESET" to 6.
- Don't forget to save the files at the end.

Arduino: Upload code
Now start the Arduino IDE. Suitable codes for the GSM module should now appear in the example codes.
- In this example we choose a code called "GSM_GPRSLibrary_SMS". However, we remove the two slashes in lines 40 and 41 to convert the comments into correct commands.
- In addition, the own number (with country code) is entered in the command in line 40. The content of the message can also be edited here: »if (sms.SendSMS (" + 49123456789 ", " Hello CHIP! "))«
- Finally the code is loaded onto the Arduino and this is separated from the PC.

Connect GSM module to Arduino
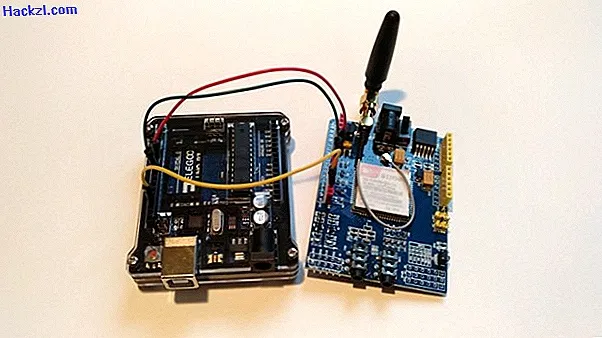
Next, you need to properly connect the GSM module to the Arduino.
- Three pins of the GSM module are connected to pins 7 and 8 and a ground on the Arduino. You can see more details in the picture.
Arduino: start up the GSM module
Finally, you can test the GSM module.
- First connect the power supply (power pack) to the GSM module and flip the switch.
- Then press the PWRKEY button on the side for 3 seconds.
- As soon as the LED flashes slowly, you can connect the Arduino to the PC so that it also starts now.
- Finally, open the serial monitor with [Ctrl] + [Shift] + [M].
- You should receive a new SMS a few seconds later.

In the next practical tip we will show you how you can build a light barrier with an Arduino.
Latest videos
In order to be able to control a GSM module with an Arduino, you of course first need an Arduino.

At this point we use a GSM module from "AZ-Delivery".

You also need a 10-watt power supply.

Finally, in addition to a USB cable for the Arduino, you also need three male-to-male jumper cables.

Insert a SIM card on the back of the GSM module. This should not be protected with a PIN.

Next, reconnect these black connectors so that you can use "SoftwareSerial".

Now connect the Arduino to the GSM module.

The GSM module is connected to pins 7 and 8 and to a ground on the Arduino.

With the GSM module you can also send SMS and make calls.

Such a keypad and display are also very practical.
