
Arduino: control LEDs - how it works
Related Videos: How To Control WS2812B Individually Addressable LEDs using Arduino (April 2024).
Arduino microcontrollers make it easy to control electronic components. This practical tip shows you how to control an LED with your Arduino.
Control LEDs via Arduino: The required components
Before you can control LEDs with your Arduino, you need to make sure you've got all the necessary components.
- First of all, of course you need an Arduino. For beginners, the Arduino Uno or the Arduino Mega 2560 is recommended. Since both the Arduino software and the Arduino hardware are open source in the sense of open source, there are also cheaper Arduino boards that are not manufactured by Arduino itself, but from another company.
- In addition to an Arduino, you also need LEDs. You can differentiate between single-color LEDs and RGB LEDs.
- You should also get some resistors as the voltage of a normal Arduino pin (U = 3.3 V) is a bit too high for the LEDs.
- To make the components easier to switch, you can use a breadboard so that you don't have to solder your components.
- Also, don't forget to buy jumper cables so that you can also connect the components.
- By the way, you can find many practical Arduino beginner kits on the Internet that can save a lot of money, since all components are already included.
Controlling LEDs via Arduino: preparations
After you have gotten all the important components, you now have to make a few final preparations.
- The first thing to do is to install the Arduino IDE on your computer. During installation, you may be asked if you want to install different Arduino drivers. You should definitely do that, otherwise your computer will not recognize your Arduino.
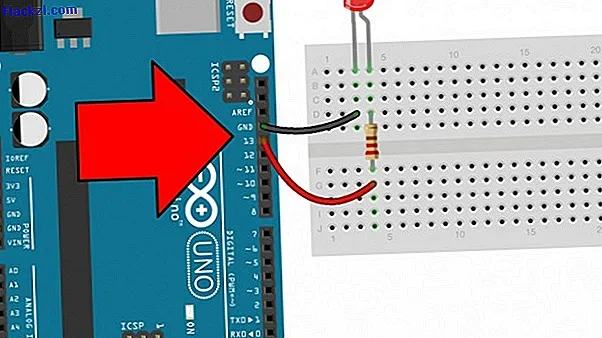
- Then connect an LED to your Arduino as shown in the picture.
- Next, start the Arduino IDE. In "void setup ()" you must first define the pin to which the LED is connected as the output. This is easily done with the command "pinMode (13, OUTPUT);" (without quotes). In our case, the LED is connected to pin 13.
- In the "void loop ()" you can then define which commands should always be executed one after the other. First you can pin 13 with the command "digitalWrite (13, HIGH);" set to "HIGH". This means that the full voltage (3.3 V) is applied to it.
- You can then use a delay command to have the program wait 1000 milliseconds: "delay (1000);"
- Then you should set pin 13 back to "LOW": "digitalWrite (13, LOW);"
- Finally, add a delay command.
Arduino: Let the LED flash
After you have finished your program and connected all components correctly, you can load the program onto your Arduino.
- If everything worked correctly, your LED should now flash.
Arduino: control the built-in LED
If you have an Arduino but no LED at hand, you can also control the built-in Arduino LED.
- Instead of the number of a pin, you simply have to use "LED_BUILTIN" in the commands.

In the next practical tip, you will learn how you can use your Raspberry Pi as a WiFi repeater. You can also get electronic components at low prices from Conrad using our discounts.