
Arduino ohmmeter: how to measure resistance
So you don't have to buy a separate meter, you can use your Arduino to measure a resistance. You can find out how to do this in this practical tip.
Arduin: Build an ohmmeter
To build an ohmmeter, you need a resistor whose value you know and an unknown resistor whose value you want to measure. You'll also need a breadboard, an Arduino, and some jumper cables.
- Connect one leg of the known resistor to the ground and the other to Analog 0. The unknown resistor is also connected to Analog 0 on the one hand, but to 5V on the other. In the end, both resistors should be connected to Analog 0 with one leg.
- You can use the following code to output the measured resistance. We will explain this to you again in detail in the picture gallery at the end of the article.
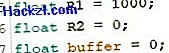
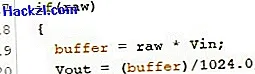
- int analogPin = 0; int raw = 0; int Vin = 5; float Vout = 0; float R1 = 1000; float R2 = 0; float buffer = 0; void setup () {Serial.begin (9600); } void loop () {raw = analogRead (analogPin); if (raw) {buffer = raw * Vin; Vout = (buffer) /1024.0; buffer = (Vin / Vout) -1; R2 = R1 * buffer; Serial.print ("Vout:"); Serial.println (Vout); Serial.print ("R2:"); Serial.println (R2); delay (1000); }}

In the next article we will explain the basics of programming with Java.
Latest videos
First you define four variables. "AnalogPin" is the variable that stores the pin to which the two resistors are connected. The "raw" variable will be used later, just like the "Vout" variable. The variable "Vin" specifies that the resistors are connected to 5V.
"R1" is the resistance whose size is known. "R2" and "buffer" are two variables that will be needed later.
In the setup method, the serial monitor is started, via which you can later output the data.

In the loop method, the value of the analog pin is first read out.

The value is then offset against the voltage of 5V and divided by 1024, since the analog input registers values from 0 to 1023.
Then the resistance can be easily calculated.

Finally, the data is output in the serial monitor.
