Audacity: Instructions and tips for beginners
Audacity is the ideal software for beginners in audio editing and editing. Our instructions introduce you to the program, because some functions are somewhat hidden. But with the following tips you can control, cut and add effects to your audio file. We show all steps in detail in our picture gallery.
Audacity Instructions: Record and Cut Audio - Introduction to the Basics
With Audacity you can improve the sound quality of audio files, but you should pay attention to the right microphone when recording. The microphone built into the notebook usually does not deliver sufficient quality. Regardless of whether you are recording a phone call or picking up a microphone for your smartphone - in the end you continue working with an audio file in Audacity:
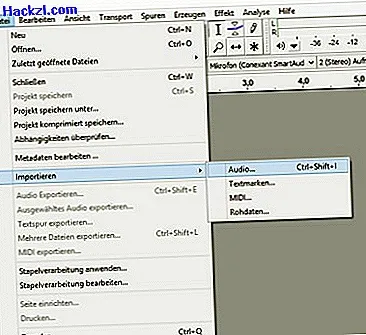
- Insert file: For good quality, the audio file should be in WAV. But you can also use a high quality MP3 file. You should convert unusual formats beforehand. Then drag and drop the file into Audacity or insert it via "File"> "Import".
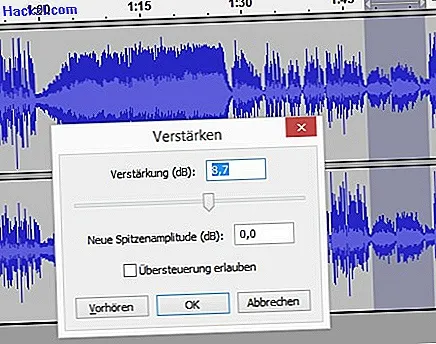
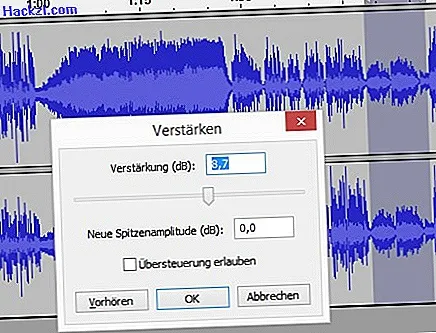
- First volume adjustment: Before you start editing, you should adjust the volume roughly - via "Effects"> "Amplify". This automatically calculates how much the volume of the entire track can be raised to reach 0 decibels at the loudest point. The smoother the absorption, the better.
- Cut: The [space bar] has the functions "Play" and "Stop". With [P] you pause at the current position and with the arrow keys you can navigate back and forth a little. This makes your work easier when editing. Read other useful shortcuts for Audacity in another article.
- The large line with the green arrow above indicates when you are playing in Audacity where you are in the track. To make a cut, press [P] to stop right here. Then cut with [Ctrl] + [I]. Alternatively, click "Edit"> "Clip Limits"> "Split Clip".
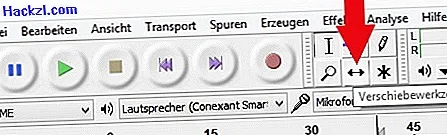
- To rearrange the separated clip, press the move tool () in the toolbar. This is located below the "Effects" menu item. Then you can move the clip.

Work properly with Audacity: basics on tracks, volume and effects
When working with multiple clips, you cannot avoid multiple tracks. The following applies to audio editing: The end of one clip overlaps the beginning of the second clip on another track. For example, you have music on the first track and a narration on the second track. Before the music falls silent, the speaker should start.
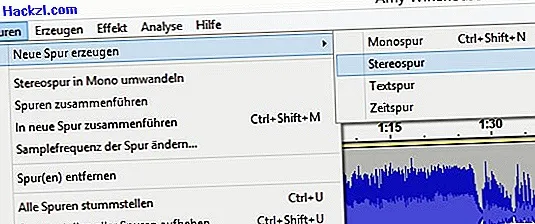
- Insert the second track with "Tracks"> "Create new track". Here you can choose between mono and stereo track. Take a look at the clip you dragged into Audacity: If there are two volume curves there, it is a stereo track. If only one can be seen, it is a mono recording (see picture gallery).
- You can use the move tool to slide and position individual clips in the new, second track. To do this, listen to the spot again and again and move the clip until it is in the right place.
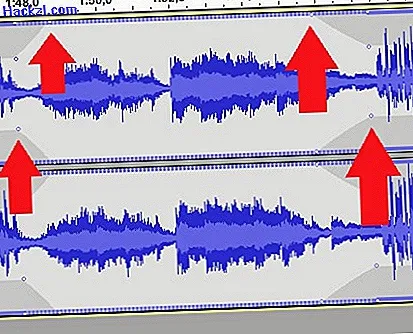
- There are various ways to adjust the volume: If the volume of a certain section appears to be the same, you can mark it and adjust it to 0 decibels via "Effects"> "Amplify".
- Alternatively, click on the "Envelope Tool", use the mouse to set points for changing the volume and then drag these points up to increase or decrease the volume. In the ideal case, the tips reach the edge as well as possible. This tool is also ideal for hiding music.
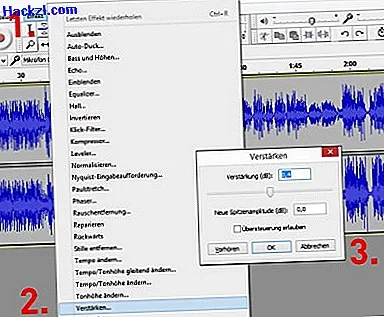
- If the volume is correct, you can use effects to remove noise, change pitch, tempo, treble and bass, and insert reverb. You can find all these options in the "Effects" menu.
- The effects usually only help trying and listening. Use [Ctrl] + [Z] to undo the effect. We thought about how to optimize the voice with Audacity.
- In the end, of course, you still have to save your project. You can find out how to do this and create an MP3 file in the video below.
If Audacity doesn't really appeal to you, you can have a look at and download the best free alternatives to the sound program.
Latest videos
Import audio file into Audacity via "File" or drag and drop it.
Use "Effects"> "Amplify" to increase the volume of the track so that the loudest point is 0 Db.
"Amplify" raise the volume of the track so that the loudest point is 0 Db. ">"Amplify" raise the volume of the track so that the loudest point is 0 Db. "/>
To move the clip, you must first select the correct tool. Then you can position the clip anywhere.
You should place the cut clip in a new track - you can do this again with the move tool.
To increase the volume, mark a section that is roughly the same volume. Then click "Effects"> "Enhance"> "OK".
"Reinforce"> "OK". ">"Reinforce"> "OK". "/>
You can adjust the volume even more precisely with the "Envelope Tool" from the toolbox: Use the mouse to set points with which you can then increase and decrease the volume.
Then it goes to fine-tuning with effects: These are often used to improve highs and lows, add reverb, remove noise and change the tempo and pitch.

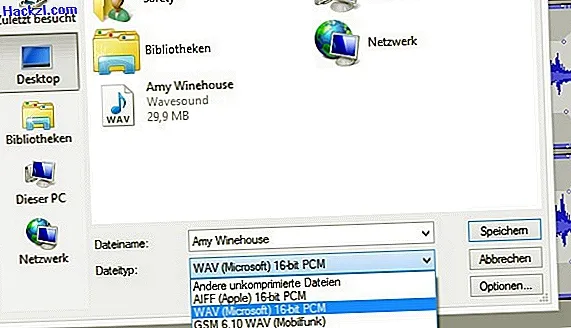
To export the audio as a file at the end, you can mark a certain part over one or more tracks and save it with "File"> Export selected audio.
Save selected audio ". Without marking everything is exported and is equivalent to the command" Export audio ".">Save selected audio ". Without marking everything is exported and is equivalent to the command" Export audio "." />

When exporting, you should use WAV for the best quality if you have also worked with WAV files. If you prefer the compressed and therefore more economical MP3 format, you should select 256 kb or 320 kb under "Options".