
Audacity: change voice - how it works
Deeper, faster, further - with Audacity you can change your voice in many ways. We'll show you exactly how it works and which tricks you can use to make your voice sound even better.
Change voice: How to adjust tempo and pitch in Audacity
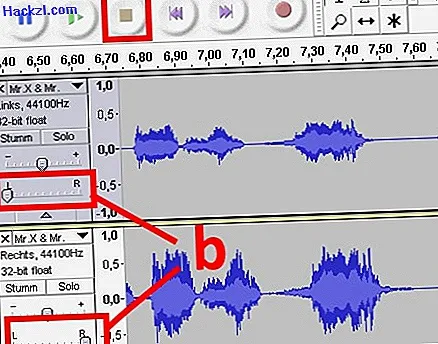
Start the Freeware Audacity as usual and first press "Stop" (a) to activate audio effects. Then play around with the following settings:
- To make your voice faster or slower, »Effects«> »Change tempo ...«. Drag the slider to the right to increase the speed and to the left to decrease the playback speed.
- If you want to change the pitch of your voice, select "Effects"> "Change pitch ..." and enter how many semitones you want to transpose your voice. Alternatively, you can use the slider. An increase of 100 percent or a reduction of 50 percent corresponds to one octave.
- To link the pitch to the change in playback speed like a record or tape, choose Effects> Change Tempo / Pitch ... and drag the slider to the right to increase the tempo and pitch and to the left to increase the tempo to decrease them.
- With »Effects«> »Change tempo / pitch smoothly ...« you create the effect of a record that is rotating ever faster. To do this, mark an area and select a low start and high end speed.
Make your voice more voluminous with Audacity
To fan out your voice, i.e. to make it sound a bit like a choir, use common pseudo-stereophonic methods. This makes her voice more spatial:
- First press Stop (a) again. Then copy the mono track with your voice. Drag a track all the way to the left and the copy all the way to the right (b).
- Move a track 2, 000 to 4, 000 samples backwards by clicking on the beginning of the track, navigating to "Create"> "Silence ...", selecting "Samples" in the dropdown menu and entering the corresponding number.
- Your voice is already more difficult to localize and continues to sound.
- Now mark a track and apply, for example, »Effects«> »Compressor ...« and reduce the limit.
- You can also change the spectral balance of a track at will with »Effects«> »Equalizer ...«, with changes up to about 10 dB.
- Apply these and other audio effects to either the left or right channel. This is how you decorrelate the two loudspeaker signals and your voice does not sound as if it simply came from a small point from the front. Instead, it sounds much more extensive; depending on the coherence of the signals as wide as a guitar or even a concert grand.
More practical tips for working with Audacity
At CHIP-Online you will find many other practical tips that will make using Audacity easier and show you how to edit your voice and other recordings:
- For example, we will help you get started with Audacity and show you how to record voices in general and how to record language for an audio book.
- You can cut out parts of recordings and also perform extensive audio editing.
- To do this, fades are essential to fade in, fade out and crossfade the audio tracks to prevent cracking and abrupt stopping.
- Before changing your voice, you should remove annoying network hum, unwanted reverberation and annoying noise if necessary.
- Now you can increase the overall sound quality and specifically improve the quality of your voice recording.
- To make your voice sound warmer, for example, a reverb effect and an amplified bass are suitable.
- We will also explain in a practical tip how you can create an autotune effect with Audacity and Gsnap.
- The most important shortcuts enable you to work with Audacity particularly quickly. You can also create your own keyboard shortcuts if necessary.

We tested these effects for your voice in Audacity 2.1.0, but they should also be available in most other versions. In Audacity you can also insert lyrics and other texts and save your individual tracks or the entire project as MP3.