
Disable automatic playback on USB sticks - is that possible?
As soon as you connect a USB stick, Windows opens the "Automatic playback". This function can also be deactivated. With this trick you will also get rid of the annoying question whether you want to check the USB stick.
Deactivate "Automatic playback" for USB sticks
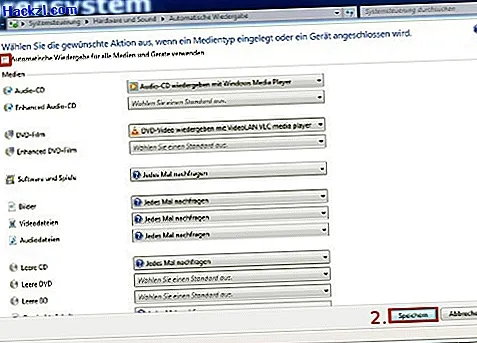
"Automatic playback" offers you all the important options for your USB stick. For example, you can directly access the file system or import music files. That sounds very useful at first. If you have always connected your USB sticks, the annoying popups also appear when the system is started. You can stop this with a few clicks.
- Start the Control Panel and select the category [Hardware and Sound].
- Click [Change default media and device settings].
- Uncheck "Use autoplay for all media and devices".
Alternative solution: Switch off the system service for "automatic playback"
Instead of simply deactivating the function, you can also directly block the shell hardware detection. This system service is behind the "automatic playback". If you do not use this function anyway, the automatic start of the service consumes only unnecessary resources.
- To deactivate the system service, first press the key combination [Windows key] and [R].
- The Run dialog opens. Enter the command "services.msc" (without quotation marks) and then click on [OK].
- You are now in the service administration. Double-click the "Shell Hardware Detection" entry.
- At "System start" select the option [Disabled].
- Next click on [Exit] (see screenshot) and confirm the changes with [OK].
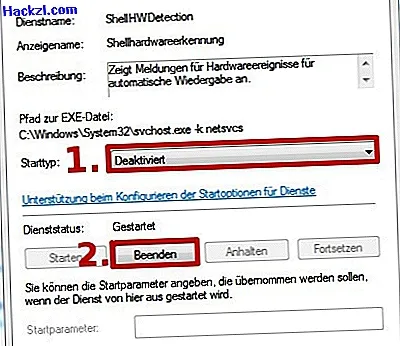
Attention: Some scanner programs rely on this system service. If you experience problems after disabling shell hardware detection, you can simply undo the above steps.
- To do this, select the [Automatic] entry under "System start".
By the way: USB sticks also have a limited lifespan. If your storage medium gives up the ghost, you can revive it with our tricks.