
Sharpening images in Photoshop: the 5 best tips
Related Videos: How to Sharpen Images in Photoshop (May 2024).
If you want to sharpen your images, you can use Photoshop. Here we give you the 5 best tips for the image editing program.
Sharpen images immediately after editing
Always sharpen your images after you have completed all operations on the image. The sharpening involves local contrast increases. Subsequent corrections to the image lead to a strange-looking over-sharpening of the images.
The filter types for sharpening in Photoshop
All sharpening filters in Photoshop can be found under Filters -> Sharpening Filters. Depending on the purpose or photo type, the filters are more suitable.
- The filters "Sharpen contours" and "Sharpen" as well as "Sharpen more" do not offer precise setting options. However, they are sufficient for large-scale, quick sharpening of an image.
- With "Edit" -> "Fade" the strength of the effect can still be reduced. Use the filters "Selective Sharpness" or "Unsharp Mask" to carry out precise sharpening, for example based on threshold values.
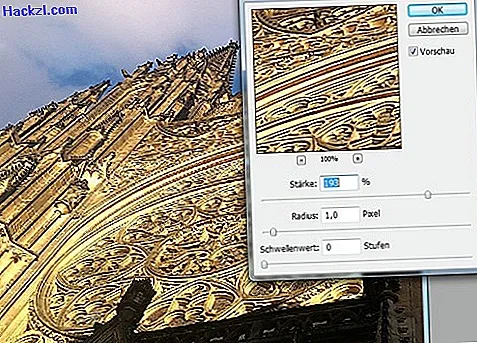
- With "Unsharp Mask" you can define the radius within which a pixel should be sharpened. The higher the radius, the stronger the sharpening behavior. The threshold value controller determines when differences from other pixels are registered.
- An interesting alternative in newer versions of Photoshop is the "selective sharpener". In addition to the "Unsharp Mask" filter options, you can also control the brightening and darkening of the edges without affecting the sharpness.
Use Photoshop Blur Filters
Sharpened images sometimes look unnatural and blurry. This effect can be weakened again using "soft focus filters" and pictures can be made softer again.
- Click on "Filters" -> "Blur Filters".
- The "Gaussian soft focus filter" is very suitable here.
High pass filter for less noise
- Duplicate the layer of the image with the key combination [Ctrl] + [J] and right-click on the new layer in the layer window.
- Choose "Fill Options". In the "Layer Style" window, select "General Blending Method" -> "Hard Light".
- Now click on "Filters" -> "Other Filters" -> "High Pass". You can also specify the radius here.
- The effect is a little softer if you select "Soft light".
Sharpen in LAB mode
To avoid color shifts on edges, sharpen in LAB mode.
- Click on "Image" -> "Mode" -> "Lab Color".
- In the layer window under "Channels" click on the channel "Brightness".
- Then click the eyes of the other channels again to better perceive the changes.
- Sharpen the brightness channel, for example with the "unsharp mask" filter. This method only changes the brightness values.
Another practical tip tells you how to crop objects by color in Photoshop.