
Clean Canon printhead - Here's how
Related Videos: Canon Pixma Druckkopf reinigen mit Ultraschall | Ultrasonic - [English + Nederlandse subtitles] (April 2024).
If you find streaks or gaps on your printouts, you should urgently remove dirt from the print head of your Canon printer. This practical tip shows you how to clean the print head properly.
Clean Canon printhead - Here's how
Start your troubleshooting by automatically cleaning the printhead. We will explain where you can find the settings for automatic cleaning here:
- Before cleaning the print head manually, first check the installed print cartridges. These cartridges must no longer have any packaging residues and must be carefully inserted in the print head.
- Perform a color cartridge test after your printer cartridge test. This is the easiest way to determine which cartridges are causing streaky prints.
- For a thorough nozzle test go to "Control Panel"> "Printer Settings" on the far right on the "Maintenance" tab.
- With the respective options, first carry out a "nozzle test" and then "intensive cleaning".
- Note : This method uses a lot of ink.
- Tip : If possible, always use the original printer cartridges that are specially designed for your Canon printer. These cartridges prevent the print head from drying out quickly and ultimately breaking. Don't skimp on ink, because cheap ink from other manufacturers may cause problems for the printer.
Manually clean the Canon printhead - Here's how
If intensive cleaning of the Canon printhead has not had the desired effect, it must be cleaned by hand. To do this, proceed as follows:
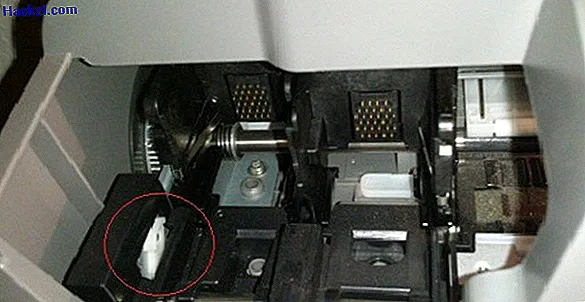
- Start your printer and open the door. Now the cartridge carriage moves into position so that you can remove the cartridges. Place the cartridges on a sheet of paper so that no air can enter the chambers.
- Now operate a gray lever on the side to release the printhead from the printer (see picture). With Canon printers, the printhead can be removed very easily in most cases. Then close the lever again to avoid damage.
- After removal, place the printhead in a container with a printhead cleaner or nozzle cleaner for a few hours so that the contacts are on the side and remain dry. Alternatively, you can also use distilled water.
- Note : Dry the contacts thoroughly if you still get wet. Do not use tap water, as limescale, for example, can damage the printhead.
- Reinstall the printhead and cartridges after the bath. Carry out a final intensive cleaning again. The print head should now be clean again. If the pressure is still not working properly, you can try the water bath again with alcohol.
- You can of course try to have the printer repaired out of warranty. In most cases, however, this is not profitable - a new printer is the better choice here.
If manual cleaning didn't help
It can happen that manual cleaning does not work either. In this case, do the following:
- If nothing still happens, you will need to buy a new printhead. This depends on the printhead. With some models, the printhead can be easily replaced and costs little money. However, this is not so easy with other models. If you still have a warranty on the printer, you should use it.
- If your warranty is no longer valid, you can have the printer repaired in this way - however, this is often very expensive. In this case, a new printer is usually the better choice.
Your Canon printer is no longer printing? You can read what this can be in another post.