
Execute chkdsk - how it works
Chkdsk checks your hard drive and fixes any errors found. In this article, we reveal how you can run the practical repair service on Mac and Windows.
Windows: Run Chkdsk
Every version of Windows has already integrated the hard disk checker. You can start it at any time:
- To do this, open Windows Explorer with the key combination [Windows] + [E].
- There you switch to the folder "Computer" or from Windows 8 in "This PC".
- Right-click on the drive you want to check and select "Properties".
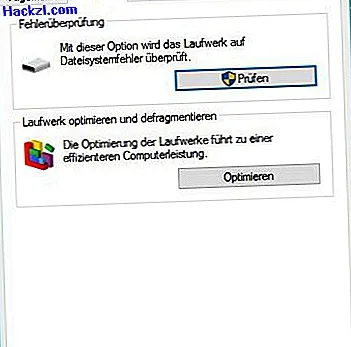
- In the new window, switch to the "Tools" or "Tools" tab (from Windows 8) and click on "Check".
- Chdsk then checks your drive and notifies you of any errors found. Mark this and confirm your entry, Windows restarts. The errors are then corrected automatically.
Run Chkdsk on Mac OS X.
There is also a program under OS X with which you can check your hard drives for errors. This does not mean as in Windows Chkdsk, but it works just as well:
- To start the tool, click on "Utilities" under "Programs" in the Finder.
- There you open the "hard disk utility".
- In the new window, you can select the hard drive you want to test on the left.
- Finally, click on "Check volume" at the bottom right and wait for the process to be completed. All errors found are automatically eliminated.
If your hard disk rattles loudly, Chkdsk is usually no longer useful. In another practical tip, we will show you how to save your drive in this case.