
Install Chromium OS on Raspberry Pi - Here's how
The slim operating system Chromium OS is ideal for smooth use on the Raspberry Pi. We will show you how you can install the open source version of Google's Chrome OS on the single-board computer.
Chromium OS on the Raspberry Pi - the requirements
- To install Chromium OS on your Raspberry Pi, you need a Raspberry Pi 2 or newer.
- You also need a micro SD card with at least 16 GB of storage space. The operating system will take up about 12 GB.
- Of course, you also need a Chromium OS image. The project's official site has been offline for some time, so you'll need to use the project's Sourceforge mirror.
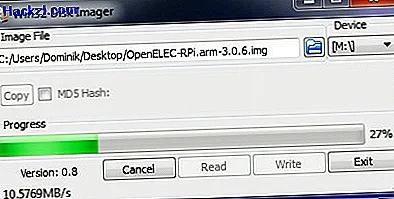
- You also need a tool that you can use to write the operating system to the SD card. The Win32 Disk Imager is recommended for Windows.
Chromium OS on the Raspberry Pi - the installation
- Connect the SD card to your computer. If necessary, use an adapter. If your computer does not have a card reader installed, you will need an external SD card reader.
- Unzip the previously downloaded operating system. The 7zip program has proven itself on Windows, Macs and most Linux distributions should master this task without additional tools.
- Now you have to write the extracted image to the SD card. Select the image file and the SD card to be written in the Win32 Disk Manager.
- After the Win32 Disk Imager has done its work, insert the SD card into your Raspberry Pi, attach it to the network and plug it into a screen. Then you can connect the computer to the mains and start it.
Chromium OS on the Raspberry Pi - the setup
Setting up Chromium OS is now a breeze.
- If you haven't already, connect your mouse and keyboard and a monitor to your Raspberry Pi first. Unfortunately, Chromium OS cannot be set up via SSH.
- An error message may appear immediately after the system starts. However, you can ignore them.
- Now your Raspberry Pi will get updates. This may take a moment. After that, you need to sign in with your Google account. The password of your Google account will later become the password to unlock the Pi.
- Now your settings are synchronized with Google. You can then make even smaller personalization settings.
In the next article you will read about the coolest projects with a Raspberry Pi.