
Crysis 2: Configure graphics settings
With the first-person shooter Crysis 2, you can configure the graphics settings in different ways. We'll show you how to get the most out of the game.
Configure the graphics settings in the game menu
You can access the graphics settings by selecting "Options" after starting the game. There you will find the entries "Graphics" and "Extended Graphics".
- Under the menu item "Graphics" are the basic graphics options. Here you can set the desired resolution and switch the full-screen mode and vertical synchronization (V-Sync) on and off. V-Sync is required on some systems to avoid display errors.
- Here you can also define the "System Settings" in the levels "High" to "Ultra". In general: The higher the value, the better the game graphics - but at the expense of performance.
- You can also activate DirectX-11 for Crysis 2 in the menu item "Graphics" ("DX 11"). To do this, however, it is necessary to download and install the "Crysis 2 DirectX11 Ultra Upgrade" beforehand. Assuming a suitable graphics card, additional DirectX functions such as tessellation or displacement mapping are activated in the game.
- Under the menu item "Advanced Graphics" you will find a number of other setting options that you can customize: "Game Effects", "Objects", "Particles", "Postprocessing", "Shading", "Shadows" and "Water". You can also set the "intensity of motion blur" here or switch it off completely.
- You can also activate "High-resolution textures" here. To do this, the "Crysis 2 High Resolution Texture Pack" must be downloaded and installed beforehand. A 64-bit Windows and a graphics card with at least 768 MB of RAM are required for the 1.7 GB package.

Use Nvidia GeForce Experience for automatic configuration
Alternatively, owners of an Nvidia graphics card can also use the "Nvidia GeForce Experience" software. The tool automatically determines the optimal graphics settings based on the existing hardware:
- Download and install the "Nvidia GeForce Experience" software.
- Start the software with a double click on the corresponding tray icon (green Nvidia logo).
- If Crysis 2 is not listed in the game list, click on "Settings" and then on "Games". Then click on the "+" and indicate the installation location of the game.
- Click "Crysis 2" in the game list. You can now see the current and optimal graphics settings in a table. With a click on the "Optimize" button, the optimal graphics settings are automatically written into the game's configuration file.

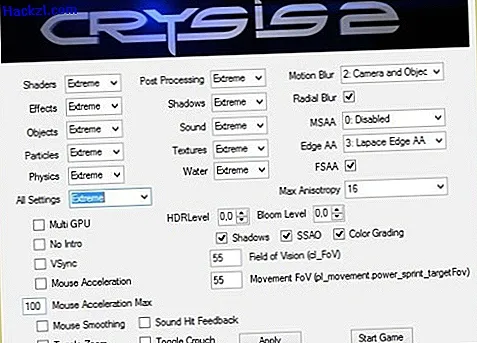
Advanced settings with the "Crysis 2 Advanced Graphics Options" tool
If you want even more graphics settings for Crysis 2, you can also download the free tool "Crysis 2 Advanced Graphics Options". With this the graphics of the game can be configured in more detail.
- First, make sure that there is no file named autoexec.cfg in the game's installation directory. You may have to delete the file beforehand.
- Download the "Crysis 2 Advanced Graphics Options" software and unzip the archive to any directory on your hard drive.
- Start the file "Crysis2AdvancedGraphicsOptions.exe". You will now be asked for the installation directory of Crysis 2. Select the correct directory and confirm with "OK".
- You now get significantly more options to adjust the graphics settings of the game to your liking.
- When you are finished, save your settings as an autoexec.cfg file with the "Apply" button. Alternatively, you can start the game with the new settings directly using the "Start Game" button.
Make sure you have the latest patch for Crysis 2 installed. Normally this will be downloaded automatically at the start of the game, otherwise you will also find the "Patch v.19" as a download from us.