
CS: GO: Create server - how it works
Thanks to practical tools, creating a CS: GO server is not difficult - be it to test different game dynamics or just to play with friends. We show you how to create your own server for CS: GO.
Create CS: GO Server with SteamCMD
With SteamCMD, a CS: GO server can be created quite easily. Thanks to the tool, you can load different modes and maps and always provide a CS: GO server with the latest updates. Here's how:
- Download SteamCMD and unzip it to any directory. Warning: Do not unzip into an existing Steam directory. This would lead to errors.
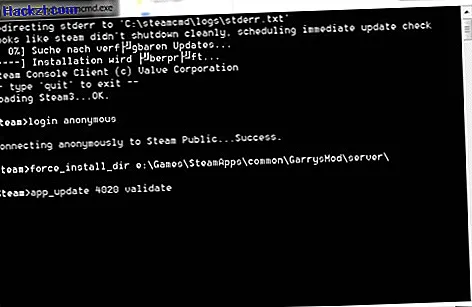
- Start SteamCMD. To do this, navigate to the SteamCMD folder using the "cd" command and enter the "steamcmd" command. When the update is complete, "Steam>" is now at the beginning of the command line. Next you need to load the server files.
- To do this, you must now log in with your Steam account. Here it is recommended to create a new Steam account, as a simultaneous login in Steam and SteamCMD is not possible. Enter "login username" to log in, where "username" is your Steam username.
- If the login is successful, an installation directory will be created. Enter "force_install_dir path" where "path" is the directory in which you want to save the server files.
- You can now download the CS: GO Server Tool. To do this, type "app_update 740 validate" and press Enter. The download may take a while.
- You can update your CS: GO server with the "app_update 740" command.
- Now all you have to do is start your CS: GO server. To do this, open a normal Windows console window. Change again with the command "cd path" to the directory in which you saved the CS: GO Server Tool.
- If you are in the server directory, you only have to enter the command line "srcds -game csgo -console -usercon + game_type 0 + game_mode 1 + mapgroup mg_bomb + map de_dust2" to start a Competitive Server. Finished! Note: To set up your CS: GO server individually, you should use the start parameters from the next sections.
Create CS: GO Server: start parameters for game modes
The different start parameters are important if you want to operate your server in different game modes and maps. The settings are clear and easy to remember. You can find all of them in the Valve developer wiki. We show you the most important settings:
- The classic game modes in CS: GO are "casual" and "competitive". It should be noted that these have their own category. This is "+ game_type" and is divided into "+ game_mode 0" for casual and "+ game_mode 1" for competitive. So if you want to start a casual server, you have to replace "+ game_type 0 + game_mode 1" with "+ game_type 0 + game_mode 0" in the example line above.
- The new game modes introduced with CS: GO are "Arms Race", "Demolition" and "Deathmatch". These fall under the Arsenal category and are indicated with "+ game_type 1". Arms Race is handed over with "+ game_mode 0", demolition with "+ game_mode 1" and Deathmatch with "+ game_mode 2". So if you want to start a Deathmatch server as an example, replace "+ game_type 0 + game_mode 1" in the above command line with "+ game_type 1 + game_mode 2."
Create CS: GO Server: start parameters for maps
It is important to note the different map pools for different games. Map pools describe the different maps available for the respective game modes. These must be clearly defined, otherwise the server will start incorrectly. We will show you the different commands below. The commands are always entered after the "game_type", as can be seen in the example command line above.
- For the classic game modes "Competitive" and "Casual" the map pool "+ mapgroup mg_bomb" is required.
- For "Arms Race" the map pool "+ mapgroup mg_armsrace" is required.
- For "Demolition" the map pool "+ mapgroup mg_demolition" is required.
- For "Deathmatch" the map pool "+ mapgroup mg_allclassic" is required.
- If you want to start the CS: GO server with specific maps, you can do this simply as in the example above with the command "+ map mapname". "Mapname" stands for the name of the map with which the server is to be started. You can find an overview of the different map names in the CS-Wiki.
On the following pages we will give you the best tips for the CS: GO Config and the most important console commands for the first person shooter.