
DSLR: Clean sensor - that's how it works
After prolonged use or if you can already see sensor spots on your pictures, it is time to clean your DSLR. Sensor spots are not uncommon, because with every lens change there is a risk of dust getting into the camera. Even with new cameras, abrasion of the lens thread can lead to deposits on the sensor. Fortunately, cost-intensive cleaning is usually not necessary at the specialist dealer. In this practical tip, we describe which options you yourself have to clean the sensor of your SLR camera and which tools you need for this.
Clean DSLR sensor - with test pattern for success control
If possible, take some time to clean the sensor of your DSLR camera.
- First, make a test picture to localize the dirt on the sensor. To do this, photograph a low-contrast object, such as a white sheet of paper or the cloudless sky. To ensure that the sensor spots are clearly visible, select a small aperture (high f-number) with not too high ISO values to avoid image noise. To see the spots on the image exactly where they are on the sensor, you have to flip the image horizontally.
- An automatic cleaning system is usually already integrated in the menu of modern SLR cameras. Call this function via the menu (name varies depending on the camera manufacturer) and let the program run. The sensor is shaken so that loose dust particles are removed. Since the longer it sticks to the sensor, the more difficult it is to remove dirt, it makes sense to start the camera cleaning program after each lens change.
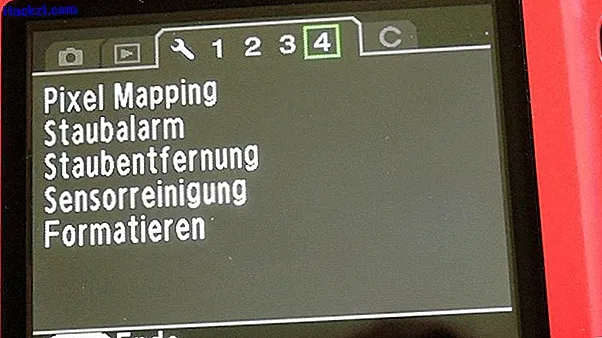
- As a rule, you also have to clean the sensor manually in order to be able to take "spot-free" photos again. Unscrew the lens and switch on your camera - you only have a clear view of the sensor when the mirror is folded up. Look for the corresponding function in the menu of your camera, for Pentax cameras this function is called "sensor cleaning", for Nikon "inspection / cleaning". If you are not sure whether you have found the right menu item, look in the manual of your camera.
- Very important: Only clean your camera with a fully charged battery or if it is reliably supplied with power via a power supply. Otherwise the mirror could fold down again during cleaning, which can damage the camera.
- A small bellows is often sufficient to blow small lint or dust away from the sensor. Hold the lens opening of the camera down so that the dirt can fall out of the camera. It is worth investing in specialty products from specialist retailers, because cheap products can cause rubber abrasion in the bellows - then you pump more dirt into the camera than you remove. With a special magnifying glass with LED lights you can directly check whether your action was successful. Take a look at the test picture.
- You can use the so-called "swabs" to remove firmly adhering dirt from the camera sensor. These are cleaning sticks of various sizes and qualities that you can use to remove the camera sensor dry or damp. Be sure to buy the size that is appropriate for your sensor format. Three drops of cleaning fluid - applied to the corners and in the middle of the swab - are usually sufficient to wipe away stubborn dirt.
- Check with a magnifying glass whether your cleaning was successful. Put the lens back on and exit the camera cleaning mode. A new test picture then brings certainty.
You can buy all accessories for cleaning in specialist shops or on the Internet. Practical are sensor cleaning kits that contain everything you need, from bellows to swabs to cleaning fluid. There are also individually packed, moist swabs for "emergency cleaning" on the go. If you don't have a magnifying glass with you on the go, you can also use your smartphone as a magnifying glass.