Excel: Grouping and structuring tables
This practical tip explains how to group and structure tables in Excel. You have to sort the corresponding columns in order to then group them. We accompany you step by step through the process.
Step 1: Exel - Sort the columns
To sort columns by which to group, follow the steps below.
- Select a cell in the column that you want to sort.
- Under "Start, " click "Sort and Filter."
- Select the "Sort from A to Z" option.

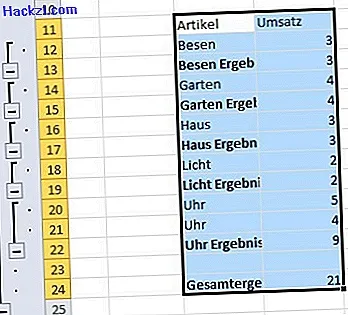
Step 2: outline and group in Excel
The grouping follows the sorting. To do this, proceed as follows.
- Select the table sorted in section 1.
- Click on "Data" in the toolbar and there in the "Outline" area on "Partial results".
- Now the "partial results" dialog window opens. Here, under "Group by", select the column by which you want to group. This is the column that you have just sorted.
- For "Using" select the type of calculation.
- Under "Add partial result to", the column that can be used to calculate is usually selected automatically. Confirm by clicking on "OK".
- Now mark the table and structure it using "Data". Here, click on the small arrow next to "Group" and select "Auto Outline".
- You can use the plus and minus outline symbols to hide or show details.