
Excel table: adjust print area
Often you have to adjust the print area for an Excel table if you want to print the whole table on an A4 sheet. In this practical tip, we will show you how to keep control over the printing of your Excel spreadsheets.
Everything at a glance: Print the table on one page
As a rule, you work in Excel in normal view. If you want to check how your spreadsheet is printed, first switch to the page view. To do this, click on the "Page layout" icon in the right corner in the Excel status line below the worksheet. If you see that the table is printed out over several pages or even graphics are broken up, proceed as follows:
- Switch to the "Page layout" tab. In the "Fit to format" group, the width and height of the "Automatic" page is entered by default. If you now want to print out a table on one page, select "1 page" under Width and Height. Excel now scales your tables and graphics so that they can be printed out on one page.
- If your table is too large to be displayed in a meaningful way on a page, you have to adjust it. You can find out how in the next paragraph.
- It may also make sense to switch from portrait to landscape. To do this, open the dialog window in the group by clicking on the small arrow in the lower right corner of the group.
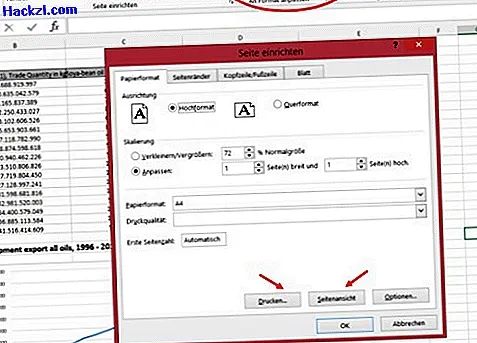
Scale Excel spreadsheet for multiple pages
If your Excel spreadsheet is too large for a single page, adjust your details. That's how it's done:
- In the "Page Setup" dialog box you can switch between portrait and landscape format and also define other paper formats. You can also check the result of your choice in this window by clicking on "Print Preview". If you are satisfied with this display, you can also start the printing process directly from this window via "Print". Confirm your changes by clicking "OK".
- If you do not want to print out the entire spreadsheet, but only a partial area such as a graphic, you can specify this in Excel. To do this, first mark the area to be printed out in normal view.
- Then go to the "Page Layout" tab. Open the dropdown menu under "Print area" by clicking on the small triangle. Select the entry "Set print area". In the print preview under "File" → "Print" you can see that now only the marked area is printed.
This practical tip was created with Excel version 2013. To share your Excel spreadsheets, it often makes sense to convert them to PDFs. You can read how to do this in the practical tip "Export Excel table as PDF - so it'll work".