
Remove wrinkles and pimples with Photoshop - the best tips
With Photoshop, you have a few tools at your disposal to remove wrinkles and pimples. Here we show you the best tips for a portrait photo without blemishes.
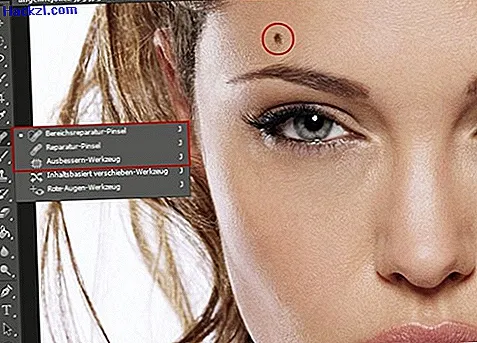
Photoshop: remove pimples
If you want to remove pimples or birthmarks, Photoshop provides you with some functions:
- Select the "Area Repair Brush" on the left bar in Photoshop by right-clicking the icon or pressing the J key.
- Now a circle appears, the radius of which you can still set on the top bar. So you can adjust the size of the circle to the size of the blemish.
- Move the circle to the point you want to remove and click on it. You can use it to completely remove pimples and birthmarks.
- Another option is the "repair brush". Here too, right-click on the "Area Repair Brush" to select the "Repair Brush".
- A circle also appears, with which you can make a copy of a skin area while holding down the [Alt] key. Note that this area of skin is as close as possible to the blemish that you want to remove. Click on the blemish to completely remove it.
Photoshop: remove wrinkles
With the "touch up tool" you can retouch larger areas and completely remove wrinkles.
- Right-click the "Area Repair Brush" and then select the "Patch Tool".
- Similar to the "lasso tool", you can use it to draw a border around the crease and drag this area onto a skin without a crease while holding down the mouse button. The fold is completely retouched.
