
Gimp: Change and set DPI - how it works
Related Videos: GIMP Tutorial : How to Adjust DPI in GIMP (May 2024).
In Gimp you can change the DPI of an image and thus adjust its logical resolution. The DPI of the image can also be set precisely when creating a new work surface. We show you how both works.
Gimp: Change the DPI of a photo
The DPI of an image describes the pixels per inch. With Gimp you can subsequently increase or decrease this value.
- To do this, open the photo to be edited in the image editing program.
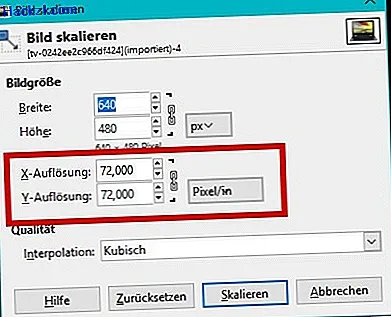
- Then click on "Image" and "Scale image" in the menu bar.
- In the new window, set the unit "Pixel / in" next to "Y resolution". This describes the unit pixels per inch, i.e. DPI.
- Now you can change the value for the X and Y resolution as desired and thus adjust the DPI of the image.
- Finally save your changes with "OK".
Gimp: Set DPI on new work surface
In Gimp you can not only edit existing images, but also create new work surfaces and work in them. Here, too, the DPI number can be set arbitrarily.
- To do this, open Gimp and click on "File" and "New" at the top. a window is opening.
- There, click on the "Advanced Settings" section.
- Next to the entry "Y resolution", set the unit "Pixel / in".
- You can then freely define the DPI using the input fields for "X resolution" and "Y resolution".
- You create the finished work surface with "OK".

This article applies to Gimp 2.8.10 on Windows 10.