
Gimp: Generate and position auxiliary lines
Related Videos: Dimensions of rectangle from coordinates example (May 2024).
With help lines in Gimp you can position graphic elements exactly. In this article, we show you how to create the auxiliary lines.
Create guides in 5 steps
To create auxiliary lines in Gimp, proceed as follows:
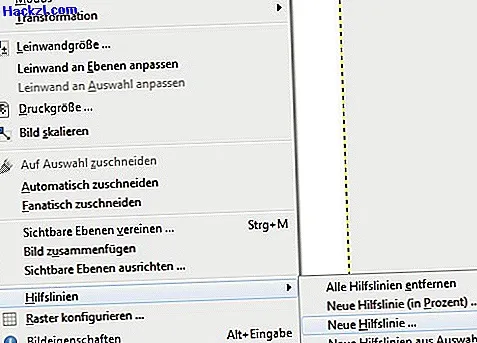
- In the menu, click on the "Image"> "Auxiliary lines" tab.
- Here you can decide whether you want to create the guide line with an absolute distance to the edge or a percentage distance:
- Select either "New Guide Line" or "New Guide Line (in percent)". For example, if you would like to divide your image into two areas, a percentage selection of 50% would be ideal.
- Now a window opens in which you can create the auxiliary line: First select whether the line should be created horizontally or vertically.
- Then enter the position to the left (for horizontal) or top margin (for vertical), either in percent or as an absolute value. Confirm with "OK" to insert the auxiliary line.
Move auxiliary lines - this is how you proceed
You can later move the auxiliary lines and adjust them to the millimeter:
- Select "Move" in the toolbox or press the [M] key.
- Then drive over an auxiliary line in the image so that it turns red.
- Now you can move the line: Click on the auxiliary line and drag the line anywhere in the picture.
- To delete all guidelines, click on the "Image"> "Guidelines" tab "Remove all guidelines".

For precise work: Magnetic guidelines
- You can work very precisely with magnetic guides. The mouse pointer snaps into the vicinity of the auxiliary line.
- You activate the feature via "View" and "Magnetic auxiliary lines".
If you want to blur images in Gimp, you will find practical instructions here.