
Gimp: create cracks
Related Videos: How to Create Cracked Skin Effect in Gimp (May 2024).
The image editing program Gimp provides you with several functions with which you can create cracks in any pattern. In this guide, we show you how to create the crack effect with Gimp.
Create a crack effect with Gimp
- Start by creating a new image with a white background. You can use about 300 x 300 pixels as the size.
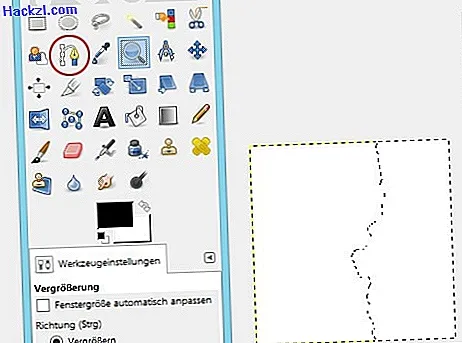
- The "Create and edit paths" tool is located within the toolbox. With this you can draw a path on your picture and convert it into a selection by clicking on "Selection from path".
- Select the "Distort" button in the "Selection" menu and first define a grain size of 12. Click "OK" and repeat the process with a granularity of 4. Your selection will now take on more shape.
Gimp: Create cracks
With the help of the layer dialog you can create several cracks and thus create an entire crack structure.
- Copy your selection (Ctrl + C) and fill it with the color black. To do this, select the "Fill with foreground color" item under "Edit". Use the shortcut Ctrl + V to paste the copied selection as a new layer. Click on the "New Layer" button (button with a single sheet), which gives the selection its own layer.
- Select the "Rotate: Layer, Selection or Rotate Path" tool in the toolbox. Click on the image and enter the angle (e.g. 1.5) to rotate its plane.
- Duplicate the top layer and repeat the previous steps to create new cracks.
- In the end, you combine the levels into one level. To do this, select a level with a right click and click on "Combine visible levels". Click "Cropped on Image" and click the "Unite" button.
