
GoPro: Create time-lapse video - how it works
Related Videos: GoPro / How to Shoot & Edit Time Lapses (Tutorial) (May 2024).
With time-lapse videos, you can impressively record particularly long processes. This practical tip shows you how to create a time-lapse video with the GoPro.
In advance: Basics for time-lapse videos with the GoPro
Before we explain how you can create time-lapse videos with the GoPro, we give you a few basics and inspirations for the motif search in advance. There are two types of recording in time-lapse videos:
- Either you record a video and increase the playback speed behind.
- Alternatively, you can take individual photos at regular intervals, which you then put together to create a video (better quality).
- Thanks to the light, versatile action cams like the GoPro, there are no limits to the time-lapse options: driving through the city on the car roof or sporting activities - everything is possible.
- Of course, you can also create "classics" like the sky, the setting / rising sun, construction sites or crowds as a time-lapse with the GoPro.
1. GoPro: The right mode for time-lapse recordings
First you have to activate the correct mode on the GoPro. The Actioncam automatically takes photos at regular intervals.
- Switch on the GoPro and press the power / mode button 3 times, so that the time-lapse mode, also called "Time Lapse", is activated.

2. Time lapse: Set the interval for photos
Depending on what you want to create a time-lapse video for, different intervals are required. This is necessary because cars are out of the picture faster than the setting sun, for example.
- After switching on the GoPro, press the Power / mode button 4 times to access the settings. Then press the mode button again 4 times to set the time-lapse interval.
- The possible time-lapse intervals range from 0.5 to 60 seconds.
- For people and cars you should choose an interval of 0.5 - 2 seconds.
- With a sunset / sunrise, clouds or crowds, an interval of 2 to 10 seconds is recommended.
- 10 to 60 second intervals are worthwhile for slowly moving shadows cast by the sun or if you want to create a 24-hour time-lapse.
3. Time lapse: calculating with the times
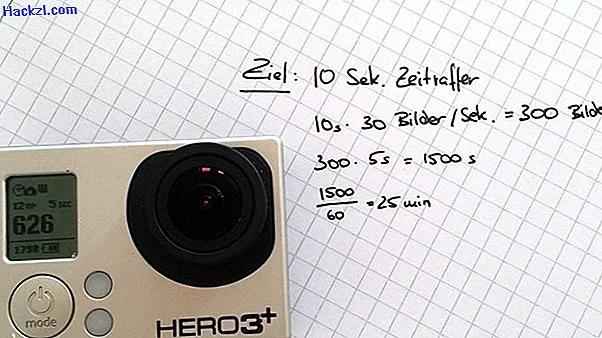
To make a video from multiple photos, you need 30 photos per second video. With this requirement, you can now easily calculate how long the time-lapse video will be.
- So that you don't record unnecessarily longer than you have to, you can calculate how long you have to film, for example to get 10 seconds of time-lapse video.
- For a 10-second video, you have to calculate as follows: 10 seconds by 30 frames per second equals 300 photos.
- With an interval of 5 seconds you need 300 * 5 = 1, 500 seconds, which is 25 minutes to create your time-lapse video.
4. Time lapse with GoPro: The recording can begin
Now that you have made the settings for your situation, the recording can be started by clicking on the trigger. You will see the red lamp flashing according to your interval. A tip for the recording: You can also attach the GoPro to a 120-minute egg timer. This gives you a 360-degree time-lapse.
- Check again that the time-lapse mode is selected in the recording mode and the correct interval appears in the top right.
- You should also make sure that the appropriate number of photos also fit on your memory card. It is best to empty the memory card again beforehand, this will make post-processing easier.
- For longer time-lapse recordings, you should use an additional GoPro battery or connect a charging cable. The GoPro has the advantage that you can also film with the charging cable connected.
5. Create time-lapse video from GoPro recordings
After the GoPro has taken photos for a while, you can now create the finished time-lapse video. To do this, the images are arranged one after the other so that 30 images are played in one second. The composition is done in no time with the free GoPro Studio.
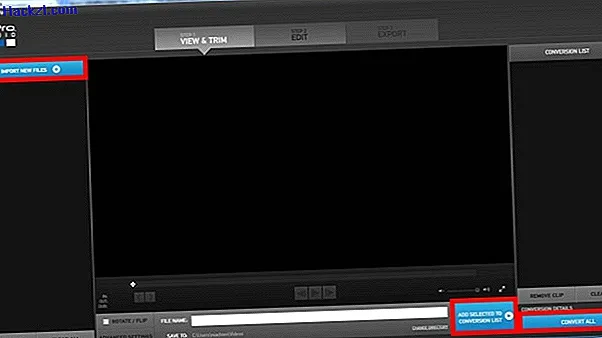
- After downloading and opening it, connect the GoPro to your computer to begin importing. To do this, simply click on "Import new files" at the top left and select the GoPro folder in which your recordings are.
- When you have imported the files, you can already press Play. GoPro Studio automatically creates a time-lapse video.
- Then click on "Add to conversation list" below the video and then on the bottom right on "Convert all".
- You can now correct settings or add texts as you like.
- In the last step, all you have to do is export the finished video. To do this, click on "Step 3 - Export" at the top right. Make sure that 29.97 frames are set.
In order to align the GoPro even better for time-lapse recordings and even film it in 3D, we will show you the best accessories for the GoPro.