iCal: A tutorial for beginners
iCal on Mac is a clearly arranged appointment and event planner. In this tutorial for beginners, we explain the functions of the tool. You can find illustrated instructions in our gallery.
Use iCal on Mac
Open the "Calendar" via the Finder in the "Programs" folder.
- Use the "Calendar" button to decide which appointments should be synchronized with the calendar. Here you can synchronize iCloud appointments as well as appointments from your mail account or under "Other", eg "German Holidays". Check the positions you want to synchronize.
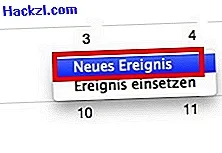
- Click on the "+" to quickly create an appointment. Here, for example, the entry "8 pm cinema Friday" is sufficient. iCal will then create an appointment for the next Friday called "Kino". You can also create an appointment directly on the calendar on a specific date by right-clicking on the date and selecting "New Event".
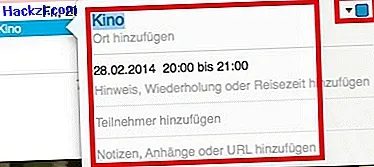
- Further details can be entered in the created appointment. For example, you can add a location, participants, notes, attachments or URLs. You can also click the date and time period to declare the event all-day or to specify a specific time period. Also decide whether the appointment is a regular one. A "travel destination" can also be added. You can use the arrow button at the top right of the opened event to declare the appointment in your iCloud as "private" or "work".
- Use the "Day", "Week", "Month" and "Year" buttons to switch between different views.
- Use the search bar to search for specific dates. By entering "cinema", for example, the cinema date created above is displayed on the right.
- Use the arrows at the top left to navigate between the months or days, weeks or years.
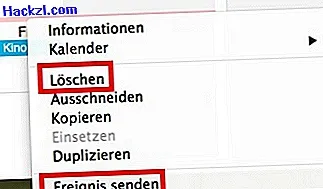
- Right-click an appointment to delete it. You can also use this to copy or duplicate entries. Via "Send event" your mail program is opened and the appointment can be sent to friends.
Another practical tip tells you how to display the calendar week in the menu bar of your Mac. We'll also show you how to share a calendar on Mac.
Latest videos
You can synchronize different appointments and events in iCal.

An event can be added with just a little information.

You can also create a new event by right-clicking on a date.
Enter all information about the event in question.
Consider individual days or months, or plan for years.

The search field lets you quickly find specific dates.

Navigate between days, months and years using these arrows.

You can delete or send events by right-clicking.