
iPad: Set up family calendar
In order to set up a family calendar on the iPad, you must first activate family sharing on iOS 8. We'll show you how it works on iPad.
Family Calendar: First set up family sharing on iOS 8 on iPad
- Open the "Settings" app and select "iCloud" in the fourth settings block. First of all, make sure that you are logged in with the correct Apple ID. If this is not the case, log out below and log in again with the correct ID.
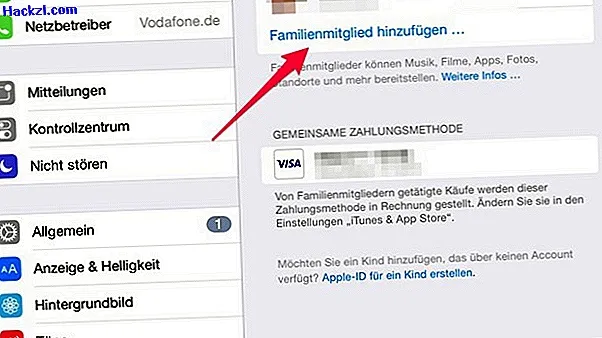
- Then tap on "Set up family sharing ..." on the right.
- An information screen appears, listing the benefits of family sharing. Tap here "Let's go".
- The next message appears that you are the organizer of the family from now on. This information is important, as only one payment method can be saved for all members when the family is released. Henceforth you also pay for the purchases of the other members. If you agree, tap "Continue".
- Now enter the password for your Apple ID and press "Next".
- You can now decide whether your family members can see your previous purchases (music, apps, videos, books) or not. If you don't want this, tap on "Hide purchases". Tip: You can change this option at any time using the Family Sharing settings.
- You must then confirm the shared payment method. The default is the one that you have used yourself. Touch "Continue."
- Next, decide whether you want to share your location with your family members. Tap "Share your location" to do this, or tap "Later" to decline the option.
- Family sharing is now activated. You can now add family members directly (see picture). The family calendar is also created. The next paragraph tells you where to find it.
Set up and use the family calendar on the iPad
- Open the "Calendar" app on your iPad.
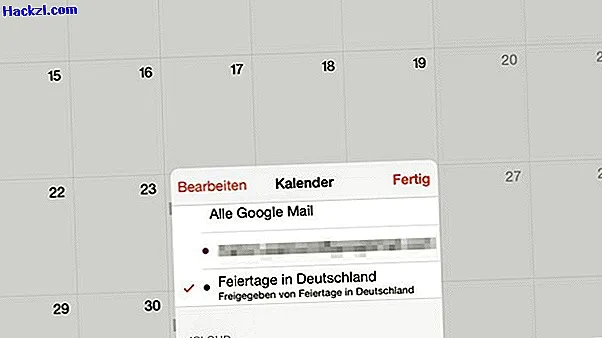
- Touch "Calendar" in the bottom center. A small window opens.
- Under the heading "iCloud" is the calendar "Family" (see picture). If there is no red checkmark in front of it, touch it and select "Done". If the check mark already exists, click on "Done".
- To enter a new appointment in the family calendar, tap the "+" symbol at the top right as usual and enter the desired dates.
- In the "Calendar" field, select "Family" and then tap "Add". The created appointment is then automatically released to all family members.
In another practical tip, we will tell you what all the family clearance has to offer.