
Soldering speaker cables: Instructions
You can easily solder speaker cables yourself. We'll show you how.
Solder the speaker cable
If you have identified a cable break by scanning, cut off the defective area and proceed as described to repair the disconnected cable:
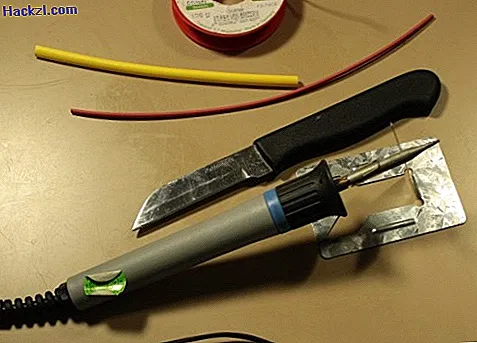
- You can see the equipment you need in the photo above: soldering iron and tin, a knife or a wire stripper and two shrink tubes with different diameters.
- Pull the larger heat shrink tubing over the speaker cable. A piece of hose about 3 cm long is enough.
- Now separate the two strands 5 cm and slide the smaller shrink tube of 2 cm length over one of the strands.
- Insulate 1 cm from this cable and from your extension piece.
- Twist the cable ends a little if they spread apart. Now wet the end of all leads with a little solder.
- Now solder one end of your extension cable to the line over which you have drawn the shrink tubing.
- Let the soldering area cool down briefly, pull the shrink tube over the exposed area of the cable and carefully shrink the tube with your soldering iron.
- Now solder the remaining leads together.
- Finally, pull the large shrink tube over the connection point of the cables and shrink it.
- You can see the result in the photo.
- Optimally, your lines have different colors. Then solder the matching color together. Alternatively, mark one of the lines, for example with insulating tape or some Tipp-Ex.
You can also use this principle to solder other symmetrically transmitting audio cables such as cinch. We explain the difference between balanced and unbalanced transmission using two typical audio connections: jack and XLR. In another practical tip, we will show you how to solder headphones.