
Lightroom correction brush: how the tool works
Related Videos: Lightroom 6 tutorial - How to use the Lightroom Brush Tool (May 2024).
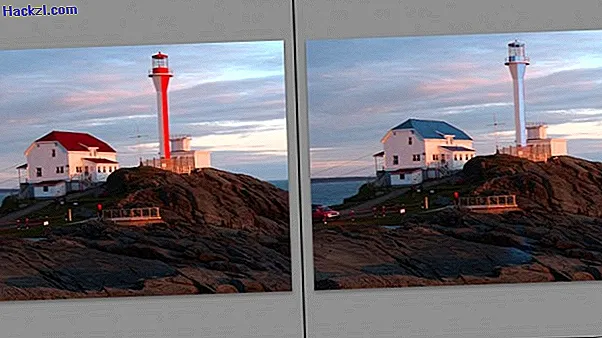
With the correction brush, you can exchange entire colors in images in Lightroom in just a few steps. You can find out how to get the most out of the tool in the following practical tip.
Use of the correction brush in Lightroom
Use the correction brush in Lightroom to make exposure corrections or retouches. In addition, entire areas of color can be changed with this ingenious tool.
- In the "Library" module, first select the image you want to edit.
- Switch to the "Develop" module.
- You will now see a new palette with many different setting options below the correction brush symbol.
- Select the area in the image that you want to change color.
- A black dot with a gray border, called a pin, indicates the point at which you started your first correction stroke.
- Set the saturation control to -100.
- If you now move the correction brush over the image, shades of gray appear. Select a different color by clicking on the rectangle next to "Color".
- It is also best to tick "Automatically mask". This way you can easily paint over the edge, because Lightroom marks the area for you.
- You can also use the correction brush to make several corrections in the image if necessary. To do this, click on "New" in the brush tool palette and define the desired correction settings.
- Optimize your image further by experimenting with exposure, clarity and contrast. This is the easiest way to learn about the effects of the settings.
Adjustment options for the correction brush
Lightroom offers you various brush properties in the range of the correction brush.
- The density determines the opacity of the correction. This usually remains at 100% and does not have to be changed.
- The flow controls how strongly several brush strokes overlap. The specification is only used if the density is not 100%. Usually you can accept the value here as well.
- The size indicates the diameter of your brush. The size is shown as a white circle in the image. It is best to set the dimension so that the brush does not protrude beyond the narrowest point of the correction.
- The soft edge controls whether the brush paints with a hard line (default 0) or your correction is gently faded out (default 100). The higher the value for the soft edge, the farther the outer gray ring is from the inner white ring. Usually a high value is better for the result.
- With "Automatically mask", Lightroom independently selects image areas that belong together.
Lightroom: partially cancel corrections
If you have corrected too much once, you can simply delete the protruding correction areas.
- Click the pin of the area you want to remove. Place a checkmark under "Show overlay for selected mask" under the preview image so that the correction area is marked in red.
- In the Brush tool palette, click Delete. Now you can use the brush as an eraser.
- If you do not want to delete the correction area completely, but only want to weaken it, you can e.g. B. change to 40%.

CHIP Academy: How to become a Lightroom professional
The next article will show you how to sharpen images with Lightroom.