
Mac OS X downgrade - how it works
In this practical tip, we will show you how to downgrade under Mac OS X.
Preparations for downgrade on Mac OS X
Before you start, you have to save your data on an external storage medium:
- To do this, start the hard disk utility.
- On the left side, select the drive you want to backup from.
- In the right part of the program, click the "Restore" tab.
- Then drag the boot volume into the "Source" field and the external hard drive into the "Target medium" field.
- Click on "Restore" to start the backup.

Mac OS downgrade via Time Machine
The easiest way to downgrade is through Time Machine:
- To start the program, hold down the selection key ("old") when restarting until the start manager appears.
- Select the "Recovery" partition here. In the following window click on "Restore from Time Machine backup".
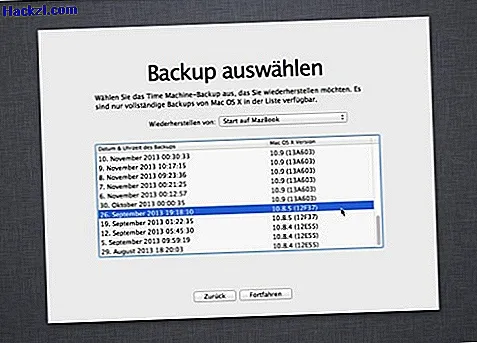
- Select the drive for the backup from the list.
- You will then see a list of all available backups. Find a backup with an earlier version of Mac and start the backup.
Downgrade: alternative to time machine
If you do not have a backup in Time Machine or you want to do a complete reinstallation, contacts, calendars and mail accounts must be saved, unless they have been stored in iCloud.
- First export the address book via "File"> "Export"> "Contacts archive".
- The calendar is also saved in this way. You can import the exported ICS file later using "Import".
- Safari bookmarks can be easily saved using the Finder. To do this, hold down the Option key and open the "Go To" menu and then "Library". Drag the "Safari" folder to the external hard drive to back it up.
- To save your pictures, start iPhoto or iPhoto Library. Select all pictures and folders and choose "File"> "Export".
Mac OS X: Reinstall after backup
After successful data backup you can start with the downgrade. In our example, we downgrade from Mavericks to Mountain Lion:
- If you have already purchased Mountain Lion, you can find it in the App Store under "Purchases". If not, you can buy it from the App Store for around 18 euros.
- Since you cannot install an outdated system over a new one, you will need an approx. 8 GB USB stick.
- Then create a bootable USB stick. Find out how in a further practical tip.
- After starting the Mac from the USB stick, the "OS X Utilities" window appears. Select the disk utility here.
- Here you can either create a new partition or delete the hard drive completely.
- Then switch back to the first window and select "Reinstall OS X". The installation begins and you have to select the empty volume.
- After successful installation, you should first bring the system up to date and then install all the necessary programs and backups.

The practical tip is based on Mac OS X Mavericks and Mountain Lion. If you are not satisfied with iOS 8, you can also downgrade to iOS 7 here. We will show you this in the next practical tip.