
Magix Video Deluxe: Create a smoke intro - how it works
A good intro is the basic requirement for a successful video. This practical tip shows you how to create a smoke intro with "Magix Video Deluxe".
Create a smoke intro with Magix Video Deluxe
- Start the video editing program "Magix Video Deluxe" and open a new project.
- Now import a video with a cloud of smoke that conveniently moves from left to right or the other way around. The following explanation applies specifically to a smoke cloud movement from left to right. Such a horizontal movement makes it easier to fade in a film title later, for example.
- Insert your desired title using the title editor. Make sure that the text doesn't get bigger and longer than your video sequence with the cloud of smoke. If you mark your title, you can individually set the font and the font color. Confirm your settings with the tick in the top right corner.
- Next, drag your title sequence in the third track to the same length as your video with the cloud of smoke in the first track of the timeline.
- For your smoke intro you need an alpha mask of 1280x720 pixels. An alpha mask is just a white picture. With a free image editing program such as "Paint" you can create an alpha mask quickly and easily.
- Now import your alpha mask into the second track of the timeline. Drag your mask to the same length as your title and your video with the cloud of smoke.
- Now mark your alpha mask in the timeline. Then go to "Effects" -> "Video Effects" -> "Chroma Key" and then select "Alpha" under the "Color to be hidden" option (see screenshot).
- Adjust the position and size of your alpha mask. To do this, click under "Motion Effects" -> "Position / Size" on the top right button "Edit". You can now move your alpha mask around in the preview window. Move it so far to the left that the right side of the alpha mask is at the point in time at which your cloud of smoke begins to move. Put a keyframe at this point.
- Now change to the position from which the cloud of smoke does not move further to the right. A keyframe is automatically set at this point. Drag your alpha mask to this specific position so that your title is fully visible again. Your extravagant smoke intro is ready and can be viewed using the preview function.

Create a realistic smoke intro with Magix Video Deluxe
Your personal smoke intro is ready so far, but the text of your title still has a relatively sharp outline. Make a smooth and realistic transition between title and cloud of smoke with just a few clicks:
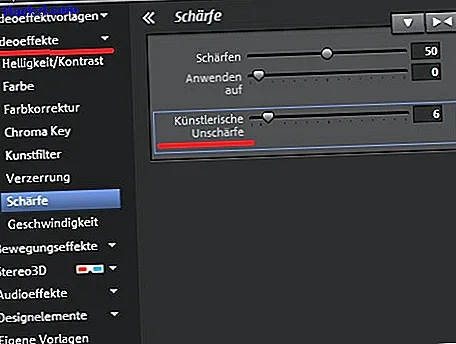
- Mark your alpha mask and under "Effects" -> "Video Effects" -> "Sharpness" set the artificial blur to "6", for example. Due to the soft transition of the artificial blur, you generate the impression that your title is created directly from the cloud of smoke.
- Under "Effects" -> "Video Effects" -> "Color", you can give your smoke intro a desired color. If you want to change the color, you would first have to mark your three tracks in the timeline.
Learn how to create another highlight with a "SinCity effect in Magix Video Deluxe" here.