
Change mainboard - a guide
Related Videos: How to replace your PC’s motherboard in 8 easy steps | Hardware (April 2024).
If your PC is getting a bit old, you can change the mainboard. We will help you in this guide and show you how to get your computer up and running again.
Install new mainboard in the PC: you have to pay attention to that
If your PC needs an eternity to start some programs or games, you should replace the mainboard with a newer one with a faster CPU. If the PC is already outside the warranty period, you can do so without hesitation. We also show the steps in detail in our picture gallery. You only need a Phillips screwdriver for screwed PCs. Some PCs can also be opened without tools. A new motherboard must of course fit into the case. You will often find information on the form factor (size of the mainboard) in the manual or on the manufacturer's website. You can usually continue to use an existing graphics card or hard drive (e.g. SATA).
- Before opening, shut down the PC and pull out the mains plug and all other cables that are connected to the PC. Before you unscrew the housing or open it with clips, ground yourself. For example with an earthing bracelet. In this way you avoid possible damage to your PC due to static discharges.
- Next, remove all built-in cards (eg graphics cards). To do this, either loosen the screws or retaining clips on the slot plates. Carefully pull the cards out of the mainboard slots and set them aside.
- Now disconnect all cables that connect the built-in devices, such as speakers, power supply, hard disk and DVD drive to the mainboard. Most cables are protected against polarity reversal. For safety, you can take a photo before unplugging it, which makes it easier to plug it into the new mainboard.
- If you want to continue using the RAM, carefully open the retaining clips on the memory modules and remove them. Beware of static discharge! Only touch the modules by the edges, never by the terminal block.
- If the mainboard is screwed on, remove all the retaining screws. The CPU with fan can remain on the old mainboard, since you usually want to use a faster CPU on a new mainboard.
- Now place the new mainboard in the housing and screw it onto the holding plate (see picture gallery). To do this, use the same screws with which the old mainboard was screwed on.
- Next, insert the CPU belonging to the board and the memory modules (possibly the existing ones) and reconnect all cables to the loudspeaker, power supply and drives. Check the cables for correct polarity and tight fit.
- It continues with the plug-in cards, which you also carefully insert on the new mainboard and screw or clip onto the slot bracket (see picture gallery).
- Before you close the case, you should test whether the PC starts. This simplifies troubleshooting if, for example, a memory module, cable or the graphics card is not inserted correctly. To do this, connect the power cable, keyboard, mouse and monitor to the PC and start it. Caution, do not reach into the device during this time.
- If the PC starts with correct indications on the monitor, switch it off and close the housing. Unplug the power cord beforehand. At the final full start, the operating system will ask for new drivers or you can install an up-to-date operating system.

Operating systems in check: is Linux Mint the better Windows 10?
Next, you should read how to install an SSD hard drive in the PC.
Latest videos
Depending on the shape of the housing, the PC is crowded but tidy.
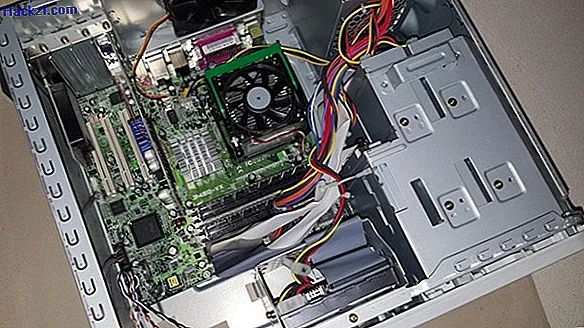
The plug-in cards in the mainboard slots are secured with screws or clips.

In the area of the memory modules, the cables of the drives, fans, speakers and power supply are connected to the mainboard.

The mainboard is screwed to the case.

The CPU and the CPU fan do not have to be removed and can remain on the mainboard.

You do not need to remove the hard drive built into the housing. It also remains in the housing.

Existing DVD and floppy drives can also continue to be used.

The new mainboard must fit into the case. The form factor (size of the mainboard) and the connection strip should match the housing.
