
Mumble: Create a server - how it works
If you want to create your own voice conference with Mumble, you need your own server. We'll show you how to do it step by step.
Step 1: install Mumble and Murmur
- First download the latest version of Mumble and start the installation.
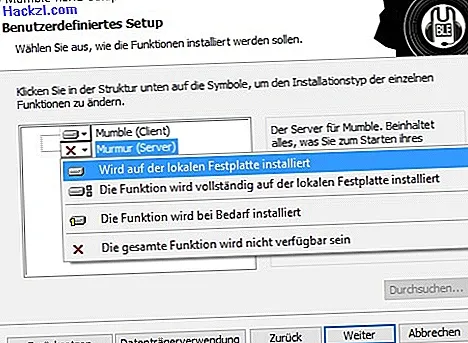
- Accept the license agreement and click on "Murmur (Server)" in the next step.
- Select the option "Will be installed on the local hard disk" and click on "Next".
- The software and the server software are installed using the "Install" button.
Step 2: set up Mumble and Murmur
Note: Always differentiate between the two tools Mumble and Murmur in the instructions.
- Start Murmur and then confirm the security query of the firewall.
- Right click on the icon in the system tray and select the "Show Log" option.
- In the middle you will find the password for the "SuperUser" as well as the port below.
- Now start Mumble and follow the setup wizard. Here you can customize the software according to your needs.
- Then select the "Automatically generate certificate" option and exit the wizard.

Step 3: Create your own server for Mumble
- If you click the "Add server" button in Mumble, you can create your own server.
- The name is freely selectable. Use "localhost" in the local network for the address, use your own IP address in the Internet.
- You already saw the port, user name and password in step 2 in Murmur and can now insert them.
- Close the window with "OK", select your server and click on "Connect" below.
- Confirm the following query with "Yes" the server is created.

Teamspeak introduces new feature "TS Sync"
Tip: In the next practical tip, we will show you how to set up the Mumble server correctly.