
Set up NAS server - how it works
Fortunately, if you want to set up a NAS server for the first time, it's not that difficult. With this quick guide, it works without problems. The article describes how QNAP and Synology, the two largest manufacturers, work. But it can also be transferred to other devices.
Unpack and assemble the NAS server
If you have not bought a fully equipped NAS, you have to install the extra hard drives after unpacking. You only need a little skill, some models also require a small screwdriver.
- Open your device according to the manufacturer's instructions. For devices without hard drive bays, there is usually a screw on the rear part of the cover, e.g. on the smaller models of the Synology DiskStation. If you unscrew it, you can carefully pull the housing backwards.
- Before you open the antistatic packaging of the hard drives, ground yourself briefly on a metallic object such as your heater. Now you can remove the drives without damaging them through electrostatic discharge.
- Now install the hard drives. If you have to screw the hard disks into the NAS for this purpose, be sure to use the screws enclosed with the disks. Other screws can damage the thread. Connect the cables as well. There is only one correct way of plugging in here;
- If your NAS has drive drawers, you can simply unlock them and pull them out carefully. This is often done with a small lever on the drawer. You can conveniently insert your hard disks there and press them into the specified connections with light pressure. Here, too, the connector only gives one correct option. The drawers can then be reinserted and secured.

Set up and connect the NAS
All you need for the installation site of the NAS is a power and a network connection. Loud devices can disappear into the basement.
- Be sure to put the NAS in a dry, cool, and dust-free place. The hardware will thank you with a longer lifespan.
- Even if your NAS server has a WLAN connection, you can be connected a little faster with a cable. Devices with a 1000 MBit connection only develop their full speed over a gigabit network.
- Once set up and connected, you can also switch on your device.
Firmware installation and first login
After you have switched on your NAS, you must first install the firmware on some devices:
- The Synology Assistant helps you set up Synology devices. At the same place you will also find a quick start guide for your device, where all important steps are described in detail. You can also start the firmware installation from the Synology website after the NAS is connected and connected to the Internet.
- QNAP has the Qfinder, which you can find in the quick start guide from the manufacturer. Download and run it for your operating system. A wizard will then guide you through the installation. All other instructions can be found here.
- If the firmware installation was successful, you can log in for the first time. To do this, you need to know the IP of your device. With QNAP this is "169.254.100.100:8080" by default. If nothing happens there, the Qfinder helps. For Synology devices you can use the Synology Assistand linked above, it will also find the IP of your NAS. If neither helps, you can check your router's DHCP table.
- Type the IP into the address line of your browser and press Enter. If you assigned a name during the installation, this also works. You should now land on your NAS's login screen. There you can log in with the preset admin account. The data for this can be found in the instructions for use.

Set up NAS and services
Once you have made it to the admin screen, you can set up your NAS as you wish. Most devices now offer many services. Here are the main ones:
- After the first login, you should change the access password directly. Otherwise, intruders from the outside could tamper with your NAS.
- Most NAS offer you the option of creating multiple user accounts. In this way you determine who can access which data and whether someone can only read or write. Please note that you also have to assign access data for the various accounts, which can then lead to a separate login to the NAS on the computer.
- You can often find services for music or video streaming directly on the homepage. You work with players that can then use the music library on your NAS centrally. There you can configure, for example, the folders in which your music files are to be stored and whether you want to stream music files or just want to store them.
- Many manufacturers today offer a variety of services through their NAS servers. This ranges from simple photo libraries to cloud services and your own web servers. The setup of these services is either regulated by setup wizards, or you can find more detailed information in the instructions.
Set up NAS as a network drive
Depending on whether you have a Windows PC or Mac, you should switch on the network services for the corresponding system. There you can assign a server name and bring the device directly into your work group. The menu items in the NAS are usually clearly named. D
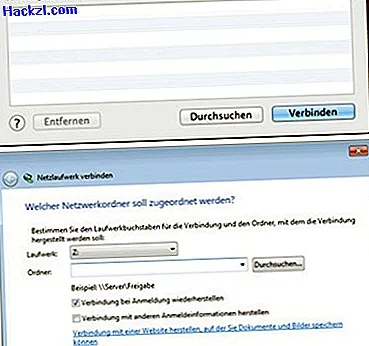
- A network drive has the advantage that you don't always have to manually navigate to the NAS. Open Explorer / My Computer and right click on "Computer". There, select "Map network drive." If you have set up user accounts, you can enter them under "Connect with other login information". Windows then asks.
- Enter a drive letter for the NAS and enter the IP of the device under "Folder". Check the box "Reconnect at login". Now your computer automatically logs in to the NAS when the computer starts.
- Registration can also be automated on the Mac. In the Finder choose "Go - Connect to Server".
- Enter the IP of the NAS there. Start the address with "afp: // ..." if you work with the Apple File Protocol. If your NAS only supports Microsoft networks, you can continue with "smb: // ...".
Tips and online manuals
You can also find the manuals of the major manufacturers QNAP and Synology online. All features are described in detail there.
- At docs.qnap.com you can find everything about QNAP NAS servers.
- The individual manuals for Synology devices can be found in the download section of the manufacturer support page.
- The support pages of other manufacturers such as Buffalo or DLink offer a similar service. A visit is always worthwhile in case of problems.
- Always keep the firmware of your network storage up to date, especially if your device is also connected to the Internet. In this way, security gaps can be closed by the manufacturer.
- Many iOS and Android apps now work together with NAS systems, so that not only your computer benefits from it.
By the way, many NAS servers can also send music to AirPlay devices.
$config[ads_text6] not found