
Nintendo Wii: Install homebrew channel
In this guide, we'll show you how to install the homebrew channel on your Nintendo Wii game console in just a few steps. All information in this manual refers to the current 4.3 Wii firmware.
Homebrew channel for the Wii - what is it?
With a homebrew channel, you can play your private software projects on the Wii without any hardware modifications. After you have set up the homebrew channel on your game console and restarted your Wii, you will find the tool as a menu item in the main menu.
- You can easily uninstall the homebrew channel at any time using regular data management in the Wii settings.
- Please note that the homebrew channel is not an official software from Nintendo. The tool was provided by private programmers. Once you install the homebrew channel, you run the risk that your game console's warranty may be voided.
Homebrew Channel: The Requirements
Before you install the homebrew channel on your game console, you need to do a few things first:
- Your Nintendo Wii must have the latest Wii firmware 4.3. If this is not the case, you must first update your console using the system settings.
- You need a completely empty SD card with at least one and a maximum of two GB of storage space. It is best to format the SD card on the computer beforehand.
- To be able to set up the homebrew channel at all, you will later have to download and use the complete "Nintendo Wii 4.3 Letterbomb Channel" package.
- Use the official Wii controller. Remove the Wii Motion Plus attachment beforehand, as it can occasionally cause problems.
Step-by-step to the Wii homebrew channel
Follow the instructions carefully to avoid possible complications or software damage to your Nintendo Wii. The exact steps can also be found in our picture gallery.
- Remove any hardware accessories from the Wii ports that you do not need to install the homebrew channel. These include, for example, the memory card or the Gamecube controller. In addition, make sure that there is an active internet connection during the process.
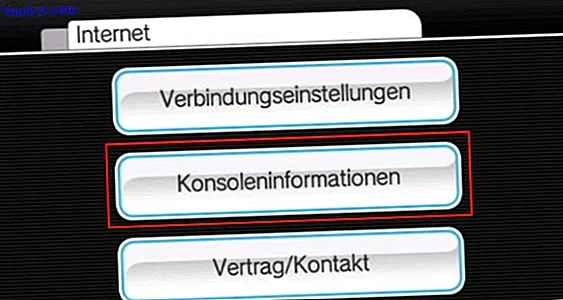
- Start your Nintendo Wii and find your MAC address under "System Settings"> "Wii Settings 2"> "Internet"> "Console Information". If you have found the MAC address you are looking for, write it down.
- Insert your SD card into the computer. Format the memory card in "FAT16" format using Windows Explorer or any program.
- Download the complete Nintendow Wii 4.3 Letterbomb Homebrew Channel package. Select "4.3E" under "System Menu Version", enter your MAC address and click on "Cut the red wire".
- As soon as you have downloaded the complete package, unzip the ZIP file directly on the SD card into the main directory (root directory). When copying is complete, insert the memory card into the Wii that is turned off and restart your game console.
- Select "Wii Wall" in the main menu of the Wii and search the history of your calendar for a red letter with a bomb on it. Select this so-called "letter bomb" to install the homebrew channel.
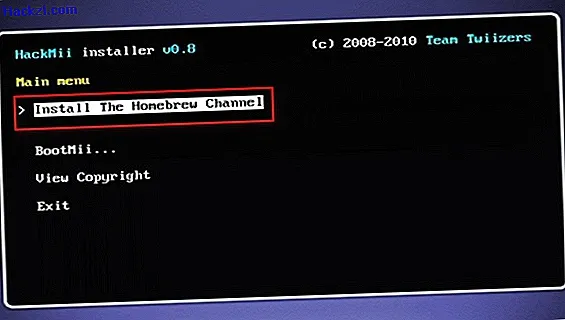
- Confirm the installer with the "A" key until you see "Install the Homebrew Channel" on your screen.
- Use the arrow keys of your Wii controller and select the option "Install the Homebrew Channel". Your game console will now install the channel. As soon as the process is complete, exit the "HackMii" installer by selecting "Return to main menu" and then "Exit".
- You will immediately get to the menu of the homebrew channel. Select "Exit to Start Menu". Now your Wii will restart or you will be redirected to the main menu.
- In the start menu you will now find a button for the homebrew channel. Select the tool and then press "Start". You are now on your own homebrew channel.
Another practical tip will show you how to transfer your data from the Nintendo Wii to the Wii U in an uncomplicated manner.
Latest videos
You can find your MAC address under "Console information". These then enter on the "HackMii" website.
Unzip the "Nintendo Wii 4.3 Letterbomb Channel" complete package in the root directory of your SD card.

Look for the "Letterbomb" in your calendar history to start the installation process.

Confirm the installation of the homebrew channel with the option "Install the Homebrew Channel".
Once you have successfully installed the homebrew channel, exit the "HackMii" installer by selecting "Exit".
