
Address ownCloud via WebDAV - how it works
The cloud solution owncloud offers numerous addressing options. In this practical tip, we explain how you can address your personal owncloud via WebDAV.
How is owncloud addressed via WebDAV?
WebDAV is activated by default on ownCloud and can be reached under the link "//IHREDOMAIN.DE/remote.php/webdav". You only have to exchange the placeholder "IHREDOMAIN.DE" for the personal domain. Don't forget this in the examples below. In this example, HTTPS stands for an encrypted connection. However, an unencrypted connection via HTTP would also be possible - this depends on your ownCloud configuration.
How to address your ownCloud via the browser
WebDAV is an extension of the HTTP protocol. It is therefore possible to display your ownCloud data in the browser via WebDAV.
- Simply enter "//IHREDOMAIN.DE/remote.php/webdav" in the browser of your choice. Don't forget to replace the placeholder "IHREDOMAIN.DE" with your own domain.
- A user and password query follows. Enter the login data of your ownCloud there and click OK.
- You can now view and download the content of your ownCloud in the browser.
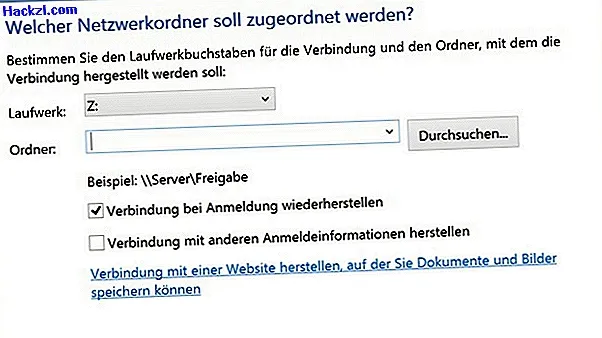
How to integrate ownCloud as a network drive
In this paragraph we show you how to integrate your ownCloud as a network drive under "My Computer". The ownCloud network drive behaves like a locally connected hard drive. So you can easily create, change, delete or move data. The following instructions refer to the operating systems Windows 8 and up. In Windows 7, the instructions may differ slightly.
- Switch to the desktop and right click on "My Computer". Now click on "Map network drive".
- In the following window, select any drive letter and insert the link "//IHREDOMAIN.DE/remote.php/webdav" as the folder. Don't forget to replace the placeholder "IHREDOMAIN.DE" with your own domain.
- Now click on "Finish" to save the settings.
- Your ownCloud is now integrated as a drive in the computer via WebDAV.
Integrate ownCloud mobile: it works with this app
The ES File Explorer app is used by many people to manage their smartphone data. There is also an option to integrate data using WebDAV. You can find out how to do this in this paragraph.
- Start the ES File Explorer app and swipe to the "Network" tab.
- There, tap New → webdav in the lower area. Enter your ownCloud server address and your ownCloud username and password. Also check the box "Encryption" if your ownCloud supports this.
- If you confirm with OK, your OwnCloud is integrated in the ES File Explorer.
- You can now find your OwnCloud in the ES File Explorer at any time under the "Network" tab and can exchange files with your smartphone.

The instructions refer to the operating systems Windows 8 and up and Android.