Shrink partition in Windows 7 - Here's how
You can shrink a partition in Windows 7 with partition management. However, it is a little hidden. How to get there and shrink a partition is explained in this practical tip.
Shrink partition with disk management in Windows 7
Before you start to shrink the partitions on your hard drive, you should first free them of unnecessary ballast, for example with the free "CCleaner". In addition, you should back up your data beforehand, a complete backup would not be wrong. Partitioning normally runs smoothly under Windows 7, but caution is required in this area.
- First log in to the user account with administrator rights and then select the "System and Security" option in "Control Panel".
- Then click on "Administration" and then double-click to open the "Computer Management".
- In the "Computer Management" menu, go to the navigation bar on the left and choose "Disk Management".
- Then all partitions are displayed and you can modify them accordingly.

Shrink partition: in three steps
- Right-click on the corresponding drive and select "Shrink Volume".
- In the "Shrink" menu, Windows 7 shows you the maximum number of MB you can shrink the selected partition. You either accept the specified value or adjust it accordingly.
- At the end you only have to confirm your decision with "Zoom out" and you will then be shown the vacated space.

With five mouse clicks to a new partition
- To create a new partition, right-click on the space that has become free and select the "New simple volume" option in the context menu. In the picture gallery you can see the individual steps.
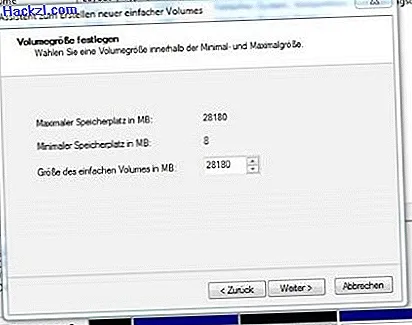
- Then you set the "volume size", Windows offers you the entire free area by default, and normally you can do that too.
- The drive letter and the path, which is determined in the next menu, can usually be adopted without any problems - as specified by Windows.
- Then the new partition has to be formatted and if necessary you can also select a different data system.
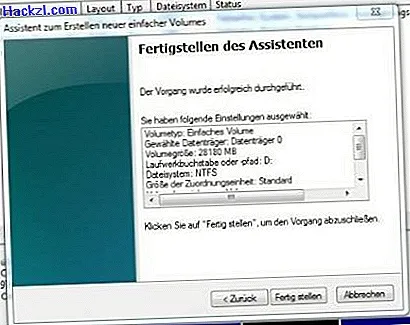
- Finally you should check all the selected settings and confirm with "Finish".
If you are not yet familiar with the CCleaner, the article "How does the CCleaner work? - A tutorial" explains the functions clearly.
Latest videos
The Windows Partition Assistant

Size of the new partition
Name of the new partition

Format Windows partition

Check the new Windows partition