
Create and delete partitions on USB sticks - does that work?
Unfortunately it is currently not possible to create multiple partitions on USB sticks under Windows. However, you can create a single partition relatively easily. We show you how it works.
USB stick: create partition - please note:
Attention: With our instructions you only create one partition on your USB stick. Although their size can be freely determined, the remaining unused storage space afterwards cannot be assigned to a new partition. Thus you artificially reduce the size of your USB stick. This is useful, for example, for old oscilloscopes that only support USB sticks up to a certain memory size. You can only use several partitions on a USB stick with Linux systems.
Partition with the Windows tool "DiskPart"
It is usually not possible to partition a USB stick, since Windows only recognizes it as a removable disk. Disk management is therefore not helpful because more than one formatting cannot be carried out there. Since XP, however, there has been a command line tool integrated in Windows called "DiskPart". This enables partitioning.
- To use "DiskPart", you have to start the command prompt with administrator rights. With Windows XP this happens automatically, from Windows Vista right click on the prompt and select "Run as administrator".
- You will find the prompt under "All Programs" -> "Accessories" in the Windows Start menu.
- Enter the "diskpart" command (enter all commands without quotation marks). You can now use various commands to access hard drives and removable media and partition them.
1. Get an overview to find the USB stick
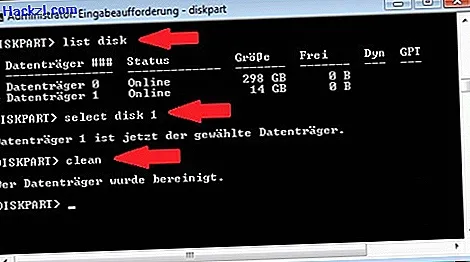
It is advisable to first use the "list disk" command to get an overview of the existing drives. The size of the USB stick can often already be identified.

2. Select USB stick and delete partitions
Once you have found your USB stick, continue as follows:
- In the next step, select it using "select disk". Enter the number on the USB stick, eg "select disk 1" (see picture).
- Tip: If you executed the above command, you can use "detail disk" to find out more about the selected drive so that you can easily avoid confusion with hard drives, for example.
- If you are sure, you can use "clean" to delete the existing partition on the selected data carrier (see picture).
Create a new partition on the USB stick
Now create a new partition:
- Enter "create partition primary" to create a new primary partition. If you want to create a smaller partition, enter for example "create partition primary size = 4000". This is how a partition with 4000 MB is created. As mentioned in the first section, you can then no longer use the remaining space on the USB stick.
- Then select the new partition with "select partition 1" and enter the command "activ". The partition is now set as a system partition.
- Then you have to format the partition. To do this, enter "format fs = fat32 quick".
- Finally, enter the "assign" and "exit" commands one after the other. The USB stick is now functional again and will appear in the workplace again after a short time.
Undo partitioning
If you want to use the full capacity of your USB stick again, you must delete the created partition and create a new unrestricted partition. To do this, go through the above steps again. This time, however, do not enter a size.
- After you have deleted the existing partition as described above, enter "create partition primary", select it with "select partition 1" and format it with "format fs = fat32 quick"
- Then enter the "assign" and "exit" commands one after the other. Now the entire storage space of your stick is available again.
This practical tip works with all versions of Windows since Windows XP. If you later have any problems with your stick, you can also format it with the Windows board tools.