
Shrink Photoshop pictures - so it'll work
How you can reduce an image in Photoshop to a desired size, we explain here in our instructions.
Shrink images in Photoshop - in 5 steps
- Open the "Image" menu in the task bar and select the "Image size" menu item. Alternatively, you can also press the key combination [Alt] + [Ctrl] + [I].
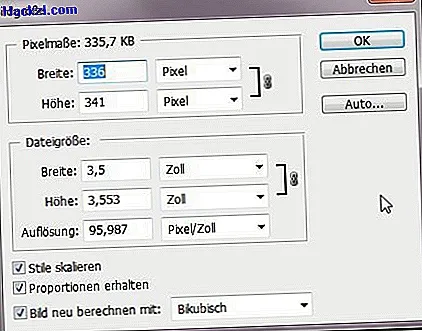
- Now the dialog window "Image size" opens, which is divided into two areas: In the upper area the pixel dimensions are displayed, in the lower area you see the length dimensions of your image. This is particularly useful if you want to print your picture.
- Select the desired unit from the dropdown menu and enter the desired height or width in one of the fields.
- If the standard settings are activated, the aspect ratios are retained. If you do not want to receive this, remove the check mark at "Get proportions".
- If the sharpness of the image is still not satisfactory after reduction, select the option "Bicubic sharper" in the "Recalculate image with" drop-down menu.
In another practical tip, we will show you how to mirror the entire image in Photoshop.