
Photoshop: blue sky - how it works
In this photo editing tip we explain how to stage your image with a blue sky in Photoshop.
Blue sky with Photoshop
A fluffy sky usually causes the photographed subject to go down a little and the desired image effect is lost. With the help of Adobe Photoshop CS6, a professional image editing program, you can create a blue sky with the numerous tools in just a few steps. We show you how to do this:
- Start the image editing program "Photoshop CS6" and open the respective image, which should get a blue sky.
- Now use a selection tool, such as the "magic wand" or the "quick selection tool", in the vertical toolbar on the left and mark the cloudy sky. Hold down the Shift key while making your selections until you have selected the full sky.
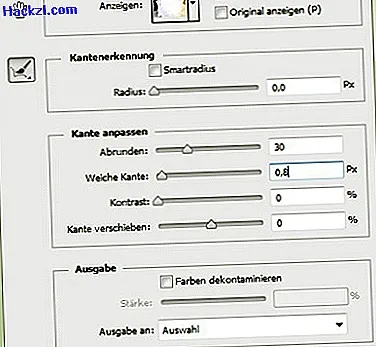
- With the key combination "SHIFT" + "CTRL" + "I", you can reverse your selection to improve the edges. You will also find this option in the menu bar under "Selection". "Improve Edge". To get a realistic image result later, you can set the value for "Rounding" to 30 in the new editing window under "Adjust edges" and to "0.8 pixels" for "Soft edge" (see screenshot). Confirm with OK.
- After your PC has transferred the desired settings to your picture, you have to place your selected surface with "CTRL" + "J" on a separate layer.
- Now open another photo in "Photoshop" with a blue sky, which should, however, match the lighting situation of your first image.
- With the Shift key pressed, you can then drag the image with the sky of your choice onto the other image so that the two images are one above the other in a window. You can close the picture with the good sky in the other window after the import.
- The last thing to do in your layer palette is to drag the plain with the good sky under the plain with the cloudy sky. By holding down the shift key, you can move individual levels individually and make a final fine adjustment. Your picture is finished with a blue sky.
In addition to a blue sky, other natural and weather influences can also create an attractive picture atmosphere. Here you will learn how to use Photoshop to create rain or to simulate a "snow effect with Photoshop".