
Create a lens flare Photoshop effect
Related Videos: Best Way to Add Lens Flare in Photoshop | All Versions (May 2024).
With lens flares or lens flades, your images look professional straight away. You can also create these effects with Photoshop.
Create lens flares with Photoshop
You can create the lens flares with Photoshop in just a few steps:
- Open the desired image in Photoshop.
- Now add a new layer. To do this, select "Layer"> "New ..."> "Layer ...".
- A new window is opening up. It is best to give the level a name here and activate the "Multiply negative" entry under Mode.
- Activate the checkbox "Fill with neutral color for the mode 'multiply negative'" at the bottom of the window.
- Select the created level and click on the "Filter" tab at the top of the screen.
- Here you will find the "Lens flare ..." effect under "Render filter".
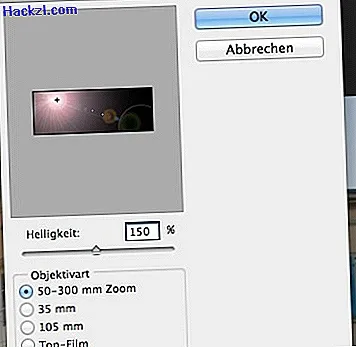
- It is best to set a brightness between 125% and 175%.
- Now you have to select the lens to be replicated. Here you should take a 50 - 300 mm lens, because this is the most natural effect.
- In the preview window you can now see the added lens flares. Click here where your light source is in the picture. How to arrange the lens flade correctly.
- Confirm the settings to apply the effects.
If you want to spice up your sunny pictures further, you can also create fog in Photoshop.