Photoshop: smooth skin - how it works
Related Videos: Easily Smooth and Soften Skin In Photoshop | High-End Retouching Techniques [FREE Action Included] (May 2024).
One of the most common uses of Photoshop is portrait retouching. Of course, this also includes smoothing the skin. In this practical tip, we will tell you how to do this trick with the graphics program.
Smooth skin in Photoshop: remove blemishes
Before smoothing your skin in a photo, you should remove any blemishes.
- First, select the "Area Repair Brush" from the toolbar.
- With the brush you can easily remove impurities and pimples. To do this, simply "paint" over the appropriate places.
- In a separate practical tip, we have put together other ways for you to remove blemishes in Photoshop.

Smooth skin in Photoshop: blur
An absolute classic in facial retouching is the use of soft focus.
- Duplicate the layer that contains your image. Right-click on the duplicated layer and select the "Convert to Smart Object" item.
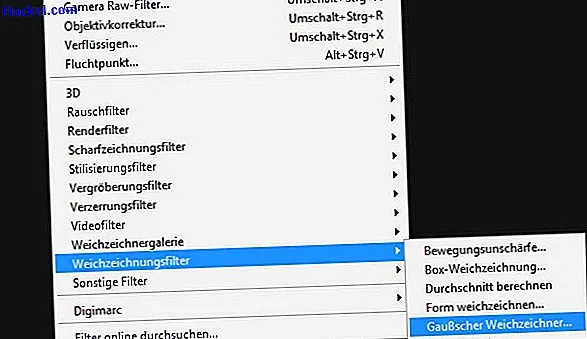
- Now add a filter via "Filter" -> "Blur filter" -> "Gaussian blur". How much you have to set the radius for the blur depends on your image and taste. It's best to try it out a bit.
- A so-called smart filter is now located below the level. Click on this and select the "Invert" button in the properties.
- Now you can paint over the picture with a soft white brush. The lighter a spot is, the more it is blurred. For this reason, it is also advisable to paint with a shade of gray first.
- Finally, you can reduce the opacity of the duplicated layer. So both levels are mixed and the soft focus looks more natural.