Photoshop: make people thinner
Related Videos: How to Use Liquify in Photoshop CC (May 2024).
In this photo tip we explain how you can make people thinner with the photo editing software Photoshop.
Make people thinner with Photoshop
The professional photo editor "Photoshop" has numerous tools that you can use to make people leaner. We show you how to do this:
- Start Photoshop and open the photo you want to change.
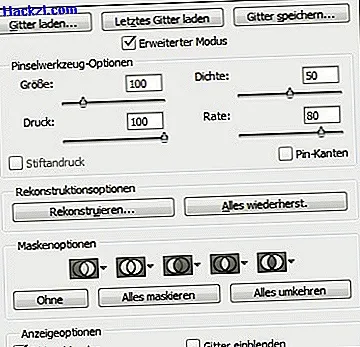
- First duplicate the original image so that you can see the before and after effect after editing. Then click on the "Liquify" option under "Filters" in the menu bar. Your picture will open in a new window. Place a checkmark in the "Advanced Mode" on the top right to display the full range of tools.
- Before you can slim down the person in your photo with the "Pinch Tool", you must first anchor the background with the "Fixation Mask Tool". This will prevent the background from unrealistically distorting later. Tip: You can skip this step if your person is in front of an even and monochrome background.
- Select the "Fixation Mask Tool" on the left and hold the left mouse button pressed as close as possible around yourself. Do not forget to fix important gaps such as under the arms. The specified area is marked in red. If necessary, you can vary the size or density of your tool on the right side. Tip: Before this fixing step, zoom in on your image with the key combination "Ctrl" + "+" to be able to work more precisely. If you accidentally fixed parts of yourself, you can undo one step at a time with "Ctrl" + "Alt" + "Z".
- Now you can carefully move the "contract tool" over the problem areas of your person without changing your background unrealistically. This step requires some sensitivity. Make sure that the natural body shape is preserved and that there are no unsightly bulges. Tip: With a larger tool tip and individual mouse clicks, it is easier to achieve a uniform surface and the desired body.
- Confirm your changes at the end at the top right with "OK". You will return to the Photoshop output window with your edited image. Remove the check mark from your original image in the layer palette in order to see the changes clearly and to be easier to understand.
- Save the new image when you are happy with the result.