
Python: GUI programming - you need to know that
Python programs look much better when they are run with a GUI (Graphical User Interface). Otherwise the terminal is often used for this. Here we show how you can program your own GUI using the TkInter module in Python.
GUI programming with Python: window with TkInter
Before you can really get started with your GUI, you must first import the TkInter module and create a window.
- To import the module, add the "from tkinter import *" command and the "from tkinter import ttk" command (without quotation marks) at the very beginning of your code.
- Now you can create a new window with the command "root = Tk ()". You can use another word instead of the word "root". However, it is advisable to use the same variable for every program so that you can find your way around the programming more easily.
- You can specify the name of your window with the command "root.title (" Test ")" (without quotation marks at the beginning and end). In this case the window is called "Test".
- At the end of your program you only have to insert the command "root.mainloop ()" so that the program is complete.
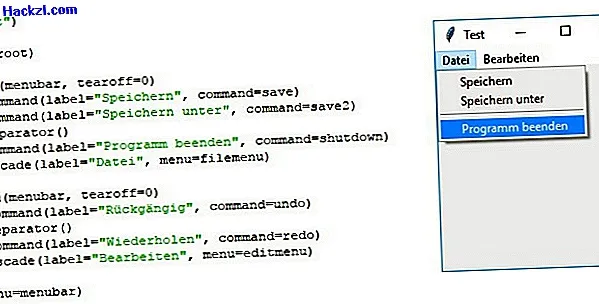
TkInter with Python: program the menu bar
A menu bar can be found in almost every program these days. You can also easily program these with the TkInter module.
- It is important that you have already carried out all of the above steps. The code for the menu bar must be inserted between "root.title (" Test ")" and "root.mainloop ()".
- You have to start programming the menu bar with the command "menubar = Menu (root)" (without quotation marks).
- You can create a first menu item with the command "filemenu = Menu (menubar, tearoff = 0)". Instead of the "filemenu" variable, you can also choose your own variable.
- Add a first subitem with the command "filemenu.add_command (label =" Save ", command = save)". In this case the sub-item is called "Save". If you press this, the "save ()" command would be executed. It is important that you have defined the commands in the code before the "root = Tk ()" command.
- Now you can add as many sub-items as you want. Tip: You can also use the "filemenu.add_separator ()" command to add a dividing line between individual sub-items.
- When you are finished with a menu item, do not forget to add the command "menubar.add_cascade (label =" file ", menu = filemenu)". This command gives the menu item the name "File".
- If you want to add further menu items, you only have to change the variable of the menu item so that no errors occur. Instead of "filemenu" you could use "editmenu" every time.
- Don't forget to add the command "root.config (menu = menubar)" before the "root.mainloop ()" command at the end of your code so that your menu bar is also displayed.
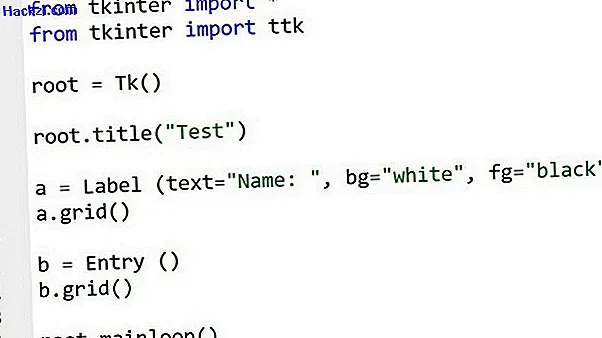
GUI with Python: add labels and entries
Now you can start adding texts and text fields to your Python program.
- You can add a first label with the command "a = Label (text =" Name: ", bg =" white ", fg =" black ")" (without quotation marks). This label is represented by the variable "a" and has the text "Name:". The font color of the text is black and the background is white.
- In order for the label to be displayed, you must write the command "a.grid ()" below it. You will find out what you need grid () for in the next paragraph.
- You can create a text field with the command "b = Entry ()". In this case the text field is represented by the variable "b".
- Again, you should insert the grid command again: "b.grid ()"
Programming TkInter: Grid and Pack - The Geometry Manager
You must have wondered what you need the grid command for:
- This command is a geometry manager. If the parentheses are empty, it does nothing.
- However, you can change your command like this: "b.grid (row = 1, column = 1, sticky = W)". The text field would now be in row 1 and in column 1 and aligned to the west (left edge of the screen).
- You can use the grid command to specify the position and orientation of individual objects. Note, however, that with this command row 0 is the first row and column 0 is the first column.
- In addition to the grid geometry manager, there is also the pack geometry manager. An example would be the command "b.pack (side = 'top', fill =" x ", padx =" 5 ", pady =" 10 ")". With the "side" attribute you can determine the position in the GUI. With the "fill" attribute you can adjust the height and width of a GUI component to the given frame. With "padx" and "pady" you can define the space around a GUI component.
- Note, however, that you can use either the grid or the pack geometry manager in a Python program. But never both at the same time.
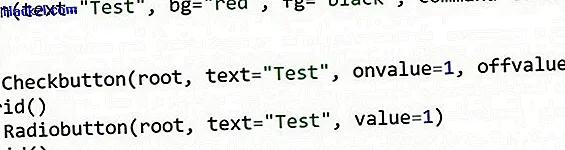
GUI programming: add buttons
Very often buttons can also be found in programs. There are three important standard buttons in Python:
- For example, you can add the normal button with the command "button1 = Button (text =" Test ", bg =" red ", fg =" black ", command = test1)" (without quotation marks). If this button is pressed, the function "test1 ()" is executed.
- In addition to the normal buttons, there are also so-called check buttons. An example of this would be "checkbutton1 = Checkbutton (root, text =" Test ", onvalue = 1, offvalue = 0, variable = var1)". It is important that you insert the "var1 = IntVar ()" command beforehand. This is the only way the program knows that the "var1" variable is an integer variable. If the checkbox is activated, "var1" takes the value "1" (onvalue). If the checkbox is not activated, the value 0 (offvalue) is assumed. Tip: You can find out this value with the "var1.get ()" command.
- Finally there is the radio button. You can add this with the command "radiobutton1 = Radiobutton (root, text =" Test ", value = 1)". All radio buttons that have the same value under "value" are activated as soon as one of these buttons is activated. Therefore, you should enter a different value every time so that only one button is activated.
- By the way, don't forget to manage your buttons with the grid or pack geometry manager.
Python: Hide Terminal
The terminal is normally displayed for every Python program - regardless of whether with or without a GUI. However, this is very annoying, especially for programs with a GUI. However, you can also hide it. We now show you how to do this in Windows 10:
- Start the Explorer and click on the "View" tab.
- Now make sure that the "File name extensions" checkbox is activated.
- Rename your Python file so that the file extension is no longer .py but .pyw.

More tips about Python in our CHIP guides
Tip: You can find further programming tutorials on our Python programming language topic page. There we show you, for example, how you can use the range and xrange functions.
$config[ads_text6] not found