
Convert RGB to CMYK - Here's how
You need to convert images from RGB to CMYK when a print shop needs the images in CMYK color mode. This works just as easily with the freeware GIMP as with the professional tool Photoshop.
Convert RGB to CMYK - with GIMP
Latest videos
Simply change the preferred color profiles in the settings.

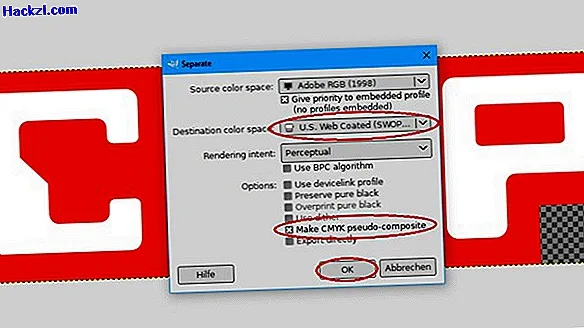
With "Seperate" you can easily convert your image into the CYMK color profile.
With the free bid editing tool "GIMP" you can change the color mode via a detour - by default this function is not available. You have to retrofit the function with a plugin:
- Download the "Separate +" plugin from the official manufacturer's website. You can find the free download at the bottom of the page. You then have to unzip the ZIP file.
- Copy files "icc_colorspace.exe", "separate.exe" and "separate_import.exe" from the extracted folder and paste them under "C: \ Program Files \ GIMP 2 \ lib \ gimp \ 2.0 \ plug-ins \",
- You also need the ICC color profiles from the official Adobe website. This download is also free. Move the contents of this zip file to "C: / Windows / System32 / spool / drivers / color".
- Now start GIMP. Under "Edit" and "Settings" select the option "Color management". Here you can select the file "US Web Coated (SWOP) v2" for "CMYK profile" and the file "Adobe RGB (1998) for" RGB color profile "from the path under which you previously inserted the Adobe color profiles,
- Now you can open an image and under "Image", "Separate" and again "Separate" convert the image into the color mode "CMYK". All you have to do is select "US Web Coated (SWOP) v2" under "Destination Color Space" and check "Make CMYK pseudo-composite".
- Your image will now be copied into the new color mode and can be saved under "File" and "Export".
Change color mode in Photoshop - quick and easy
If you have the professional Adobe Photoshop software, you can convert your images into the CMYK ink mode without additional plugins.
- Open the picture you want. To do this, go to "Open" under "File" and select your picture.
- Under the menu item "Image" you will find the entry "Mode" at the top. The current picture mode is marked with a tick - you can change the mode simply by choosing a different point.
- Photoshop will now ask for confirmation if you really want to do the conversion. Clicking "OK" will convert your image to the new color mode.
- Save your picture under "File" and "Save". The file is now in the new color mode.
Next, read with us how to remove shine with Photoshop.