
Remove write protection from the USB stick - so it'll work
Related Videos: How to Remove Write Protection from Flash Drive! - Howtosolveit (May 2024).
A locked USB stick quickly leads to trouble, for example when you can no longer copy files. We'll show you how to remove write protection here.
USB stick: write protection is not always easy to remove
- Unfortunately, write protection on Windows still causes many problems. Changes are not accepted, functions are not available, USB sticks are damaged.
- If none of the following instructions help you, this is unfortunately not an isolated case. Problems seem to be increasing again, especially under Windows 10.
- If the instructions below don't help you, you can try additional tools. The free LockHunter and the unlocker are worth trying.
The USB stick with lock switch
Similar to SD cards, some USB sticks also have small switches that switch between active and inactive write protection.
- So take a close look at your stick and make sure that any switch is set to "unlocked" or "write".
- If you don't find a switch, the problem is at the software level. Read on in the next paragraph.

Deactivate the software write protection from the USB stick
In the Windows menu, depending on the mobile hardware, you can give software write protection to an external memory. You can also remove it in the same way:
- Open Windows Explorer and click on "Computer".
- Then right-click on the stick partition and select "Properties".
- Here you will find the dialog "read-only". Make sure that the check mark is not set here.
- Note that you can usually only remove the write protection on the computer with which you set it.

Remove the unwanted USB write protection
If you accidentally removed your USB stick from your PC while reading or writing and without "Safely removing hardware", many sticks automatically switch on write protection to protect your data. How to remove the protection:
- Important: Formatting the USB stick is necessary here, i.e. all your data will be lost. If these are essential, try to save them beforehand using a tool such as "Smart Data Recovery".
- Back in the "Computer" dialog, you can try to restore the stick by right-clicking and "Format".
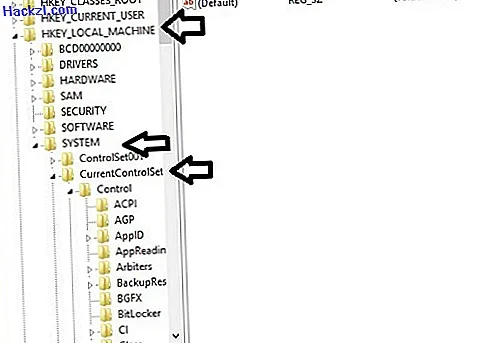
- If you get an error message here, you have to intervene directly in the system: Enter "regedit" in the Windows search and open the "Registry Editor".
- First select "HKEY_LocalMachine" in the navigation bar on the left and open the subfolders by clicking on the small arrow next to the name. Now select "System", "CurrentControlSet" and finally "Control".
- Scroll down in the navigation until you have reached "StorageDevicePolicies". If this directory does not yet exist, create a new folder by right-clicking and give it this name. Pay particular attention to upper and lower case.
- If you open the folder, two files will appear on the right. Select the "WriteProtect" entry here. If the file does not exist, read on to point 8.
- In the dialog that opens, select "Hexadecimal" on the right. Enter a "0" in the field on the left - this means that all of your external storage devices automatically no longer have write protection. Confirm your entry with "OK" and close the "Registry Editor".
- If the latter file does not yet exist, create it in the above folder by right-clicking it again and name it "WriteProtect". Make sure that you create a 32- or 64-bit file in the context menu - depending on which system your PC is running on.
- Restart your computer and simultaneously press the "Windows" and "E" keys. Right-click on the USB stick and select the "Format" option.
USB stick: Remove write protection permanently
If the write protection has still not been removed, the following procedure will help:
- Press the [Windows] and [R] keys simultaneously so that the "Execute" command opens.
- Enter "diskpart" here and click the "OK" button. Then the command prompt starts.
- Wait a few seconds, then enter the command "lis dis" and confirm with the [Enter] key.
- You will now see all data carriers listed. Then use the "sel dis X" command. Replace the "X" with the indicated number of the data carrier.
- With the "clean" command, the USB stick is completely deleted, but not yet formatted.
- Now use the commands "create partition primary", "select partition 1", "format fs = FAT32 quick" and "active" one after the other.
- The USB stick has now been formatted and allows access again. Note that this will delete all files.
Shop recommendation for Patriot Tab 32GB (PSF32GTAB3USB)

€ 8.39
To the shop

€ 10.99
To the shop

€ 11.69
To the shop
Offered by BestCheck.de | Prices include VAT plus shipping
Compare other offers
$config[ads_text6] not found