
Deactivate secure boot - how it works
Related Videos: How To Disable UEFI Secure Boot On Windows 10/8/7 (May 2024).
In Windows 8, the "Secure Boot" has been added. To deactivate this, you have to go to the "BIOS" successor "UEFI". We will guide you through the individual steps.
How to switch off "Secure Boot"
- Start your PC and press the button at the beginning of the start-up to access the "UEFI BIOS". This varies from manufacturer to manufacturer. If you are not sure which key to press, try [Del], [F1], [F2], [F12] or [ESC]. You can also find the right button in the manual.
- Depending on the BIOS version, the "Secure Boot" option is hidden under another tab. Usually this is called "Boot", "Security" or "Authentication". Navigate there.
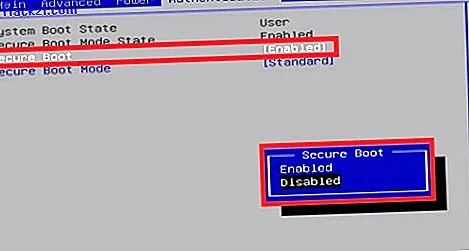
- Now you will see the entry "Secure Boot". This is set to "Enabled".
- To deactivate "Secure Boot" now, select the option with "Enter" and set it to "Disabled" (see image).
- Use the [F10] key to save the change and then restart the computer.
Tip: Your Windows 8 computer runs faster if you switch off unnecessary services.