
SketchUp to Blender: This is how the export works
In this article, we present two ways to export 3D models from SketchUp to Blender.
Program versions when exporting SketchUp to Blender
- The simplicity of Sketchup and the power of Blender can be combined very well to create, render and animate 3D models. You can use SketchUp to create the 3D model and later use it in Blender, for example for architectural visualizations, animations or for the game engine.
- There are three versions of SketchUp: Sketchup Free, SketchUp Shop, and SketchUp Pro. With the free browser version, all export functions are blocked except for the stl and png format. With SketchUp Shop and Pro you can easily export to 3ds, obj, or dae format.
Option 1: Export with SketchUp Free
Latest videos
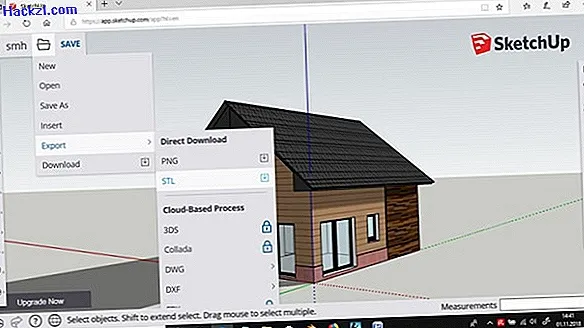
Step 1: export 3D model to SketchUp Free
Select elements in Edit mode with the [L] key

Here the possibilities are limited to continue using your 3D model in Blender. Because you can only export free of charge in the 3D printer format stl. The UV mapping for the textures is lost.
With a few manual adjustments, you can continue to use your 3D model in Blender, but you'll need to reassign materials and textures.
To do this, proceed as follows:
- In SketchUp Free, export the 3D model by clicking on the folder icon and selecting "Export".
- Select the stl format.
- Import the 3D model into Blender by clicking on "Import" in the "File" menu and selecting the stl format.
- The 3D model should now appear - but it is probably too large to view. Therefore, press the "S" key to scale and then enter, for example, "0.01" (decrease by a factor of 0.01).
- Due to the export, the 3D model is still combined in a single object. To split the model back into separate objects, switch to the "Edit" mode with the Tab key and select individual elements with the [L] key. With [L] contiguous points are selected and combined with the key [P] to a new object.
Other selection tools are: [C] for circle selection, [B] for rectangle selection and [CTRL] + [left mouse button] for the lasso selection.
In the example of a 3D model of a house, walls, roofs, windows and doors can be divided into individual objects. - The resulting objects can now be re-textured in Blender, however a new UV mapping may be necessary.
Option 2: Export with SketchUp Shop and SketchUp Pro
The much simpler variant only works with the paid versions SketchUp Shop and SketchUp Pro.
- Export the 3D model to SketchUp Shop or Pro by clicking on "Export" in the "File" menu.
- Select the dae format.
- Download the Blender "SketchUp-Importer" script.
- Unzip the zip file (e.g. with 7-Zip).
- In Blender, choose User Preferences from the File menu.
- Click on "Add-Ons" and "Install Add-on from File".
- Select the script file "__init__.py".
- Enter "SketchUp" in the input field and select the script.
- From the "File" menu, select "Import" and "SketchUp" with the file format dae.
- The imported 3D model should now appear in the view with textures.

You will get a comparison of the two graphics programs Cinema 4D and Blender in our next article.