
Install and set up Skype
With "Skype" you can make free video calls with your friends over the Internet. We show you how to install and set up the software.
Different software versions
Depending on the operating system you are using, you have access to different versions of "Skype". The procedure described here is basically the same for Windows 7, Mac and Windows 8 in desktop mode. In the Windows 8 tile interface, you also have the option of downloading "Skype" as an app. This is the only option for Windows RT users. We show you how this works in this practical tip.
Set up the desktop version of the video chat software
For Windows 7 and Windows 8 you can download the software here. If you are using a Mac, you can get "Skype" at this link. The small picture gallery illustrates the next steps.
- Run the exe file and follow the steps in the installation window. In the first dialog, make sure that you really want "Skype" to be executed every time the system is started. If not, remove the check mark. Under "More options" you can change the installation location. The rest of the installation is automatic and takes only a few minutes.
- When the installation is complete, the dialog box closes and the "Skype" start screen is displayed. Here you either log in with an existing account or create a new account (see below).
- Once you are logged in, you will see an extensive window view. If you already have contacts, they will be shown on the left. Clicking in the right part of the window opens a dialog in which you can write messages, for example. A click on the camera starts a video chat, the telephone handset starts a voice chat.
- If you don't have any contacts yet, click on the "Contacts" tab. Under "Add contacts" you can search for a friend's username or phone number, if one is available. If you want to make it easier for yourself, you can search under "Import contacts", for example your "Facebook" profile or your e-mail account, for contacts who also use "Skype".
- First you should check the software settings. To do this, click on the "Actions" tab and finally on "Options". Here you will find numerous setting options for your "Skype". The sub-item "privacy" is particularly important: check the box for who can call you and who can send you messages.
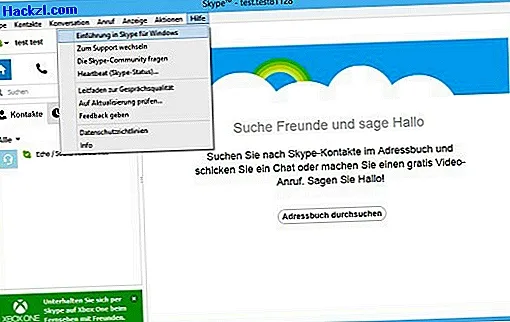
- The menu bar at the top of the program can be confusing at first, but is very intuitive. As a rule, you only need a few actions in daily use. If you still want a little more help, select "Help" and then "Introducing Skype for [Your Operating System]" to see a helpful tutorial.
- If you would like to personalize your "Skype" appearance, you can add a profile picture. To do this, select "Skype" above and then "Profile". Here you have the possibility to upload a picture or to complete your personal information.
- If you want to quit the program, click on "Skype" and then on "Close". Usually, however, only the window is closed and "Skype" continues to run. Therefore, look in the task bar, find the small green logo there and right-click on it. If you click here on "Exit", the program is finally closed.
Registering with Skype
If you do not have a "Skype" account yet, click on "Create account" in the login dialog in each version of the software. You will be automatically redirected to the browser. Here you have the possibility to link "Skype" with your "Microsoft" or "Facebook" account. If you don't want to reveal so much about yourself, you can also create a new "Skype" account in the same window. Pay attention to the fields with the asterisk - only these are mandatory, you do not have to enter your birthday or place of residence. Be sure to remove the checkmark that you agree that "Skype" may send you promotional emails. Enter a captcha directly below and confirm the information. If your user name has not yet been assigned, you are registered with it and can log in to the program or the app.

Latest videos
At the first start, a dialog opens in which you can complete your profile information.

The menu bar at the top of the screen contains all the important functions.

You can search for "Skype" contacts using your "Facebook" profile, among other things.

You should especially think about the "privacy" settings.

If you need help getting started, use the tutorial.
Finally, you just quit "Skype" via the icon in the task bar.
