
Adjust default settings in Word
If you do not want to use the standard Word settings, you can adapt them to your personal needs. For example, the font and font size can be changed. We'll show you how it's done.
Change default template in Word
- Open Word and click the "Start" tab at the top.
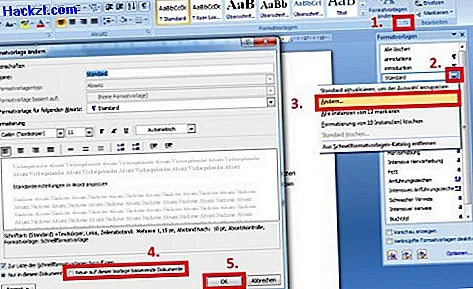
- Click on the small symbol to the right of the item "Style sheets" (see picture).
- Click on the arrow next to the "Standard" template and select the "Change" item.
- Here you can now change the template according to your wishes. Font, font size, and paragraph spacing can be easily changed here.
- If you have changed your settings, click on "New documents based on this template" and then on the "OK" button.
- Word now always starts with the standard template that you have just configured.
Adjust default settings in Word 2013, 2010 and 2007
- Open Word and click the "Start" tab at the top.
- Click on the small symbol to the right of the "Font" item (see picture).
- Now you can adjust the standard settings according to your needs.
- Then click on the "Set as default" button at the bottom left and then on "OK".

Change font permanently in Word 2003
- Click on "Format" at the top of the menu bar and select the "Characters" item.
- Now set the desired font size and font and click on the "Standard" button at the bottom left.
- If there is a query, confirm it with "Yes". Then click on the "OK" button at the bottom right.
You can carry out the same procedure for the "Paragraph" item. Here you can, among other things, set the standard settings for line spacing and line breaks. This practical tip was carried out under Word 2007 and Word 2013.